When we moved into the river house there was no tub. We have a nice big shower but no tub. My in laws (who built this house and lived here for the past 26 years) never needed one. They were shower people. My husband is a shower person. He’d be perfectly happy if we never had a bath tub again. But me? I’m definitely a bath person. I come from a long line of bath people. My dad still has a bath most days. After we moved and settled in Rex and I discussed the whole lack-of-bathtub-issue and I said that we really didn’t need one, I would just learn to be a shower person.
Thankfully my husband knows me better than I know myself most days and he knew there was no way I would survive without a tub.
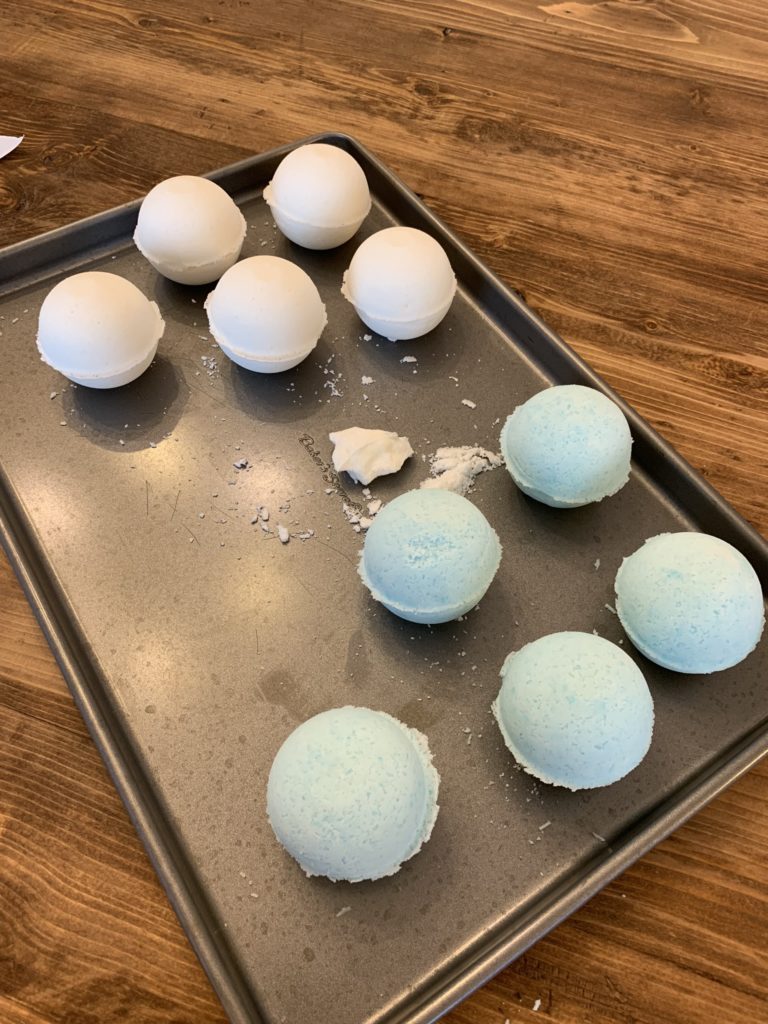
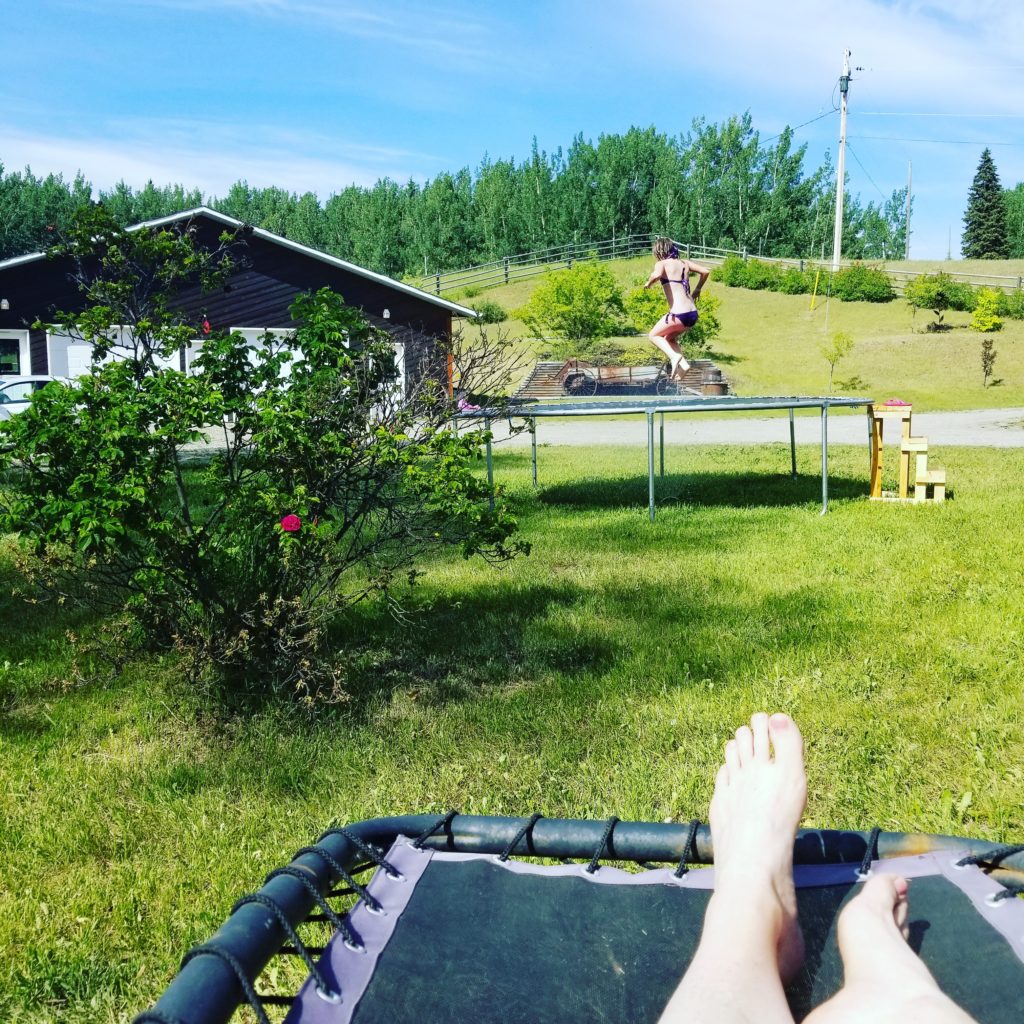
It looks like a tiny little tub in this picture but it’s not, it’s perfect in every way!
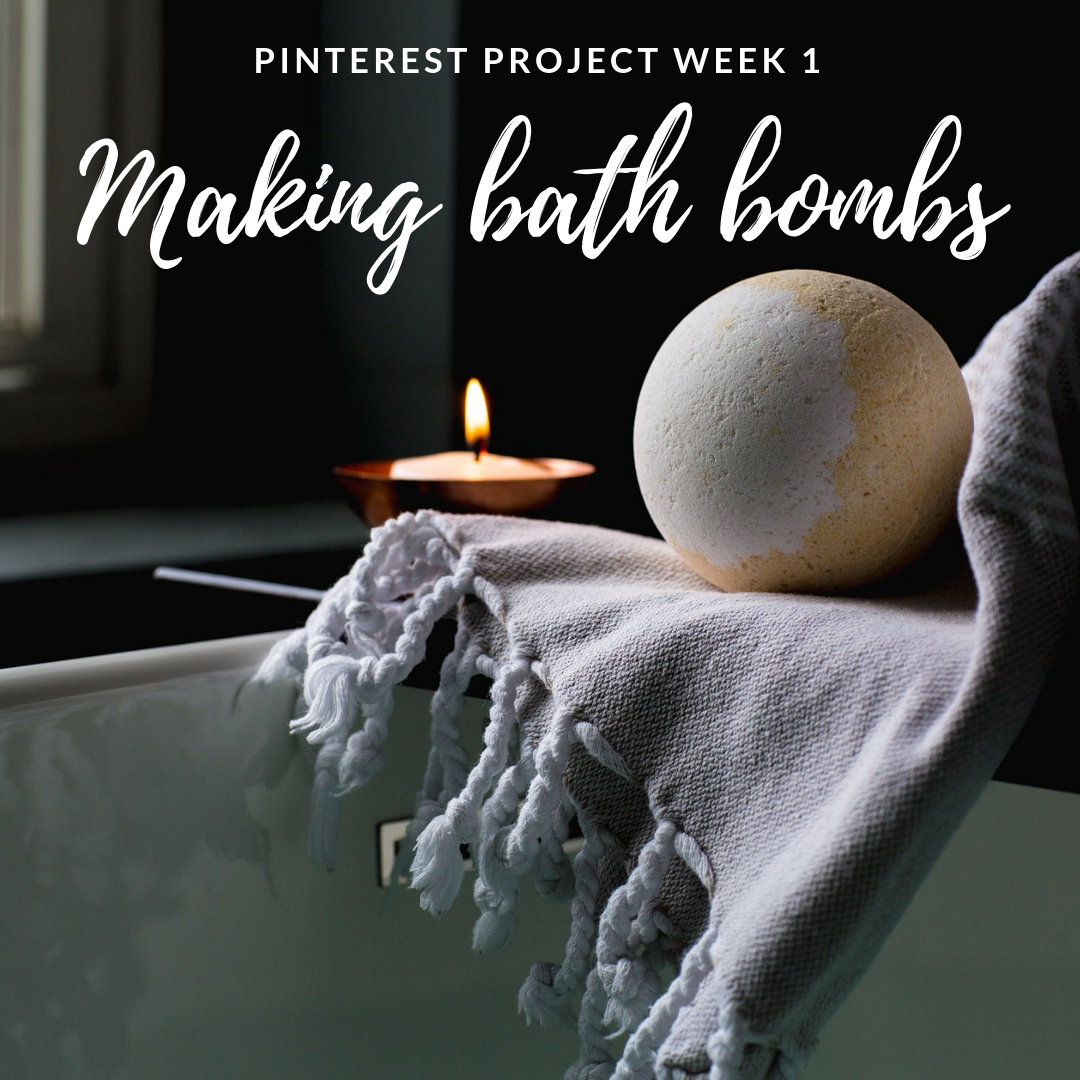
Now it took about 7 months, but we finally got a bathtub. And a beautiful deep one it is too. I have had a bath almost every single day since that baby was installed. So for my first week of The Pinterest Project it seemed appropriate that I make bath bombs.
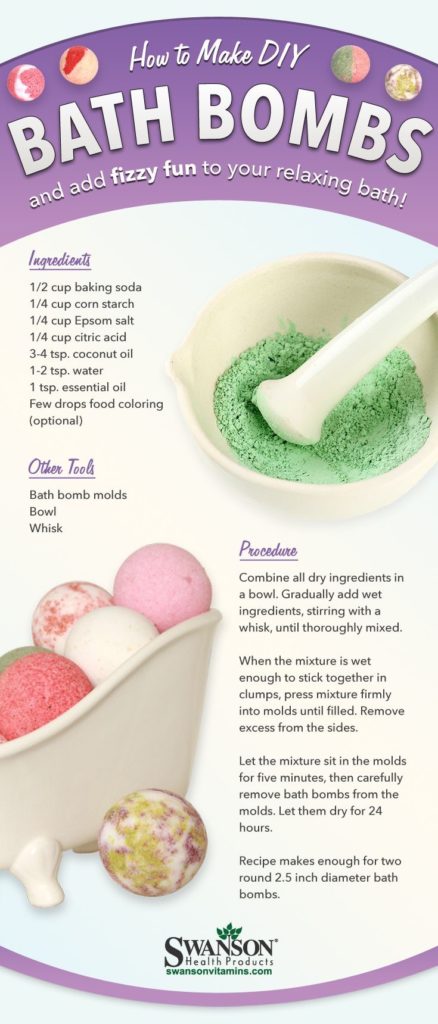
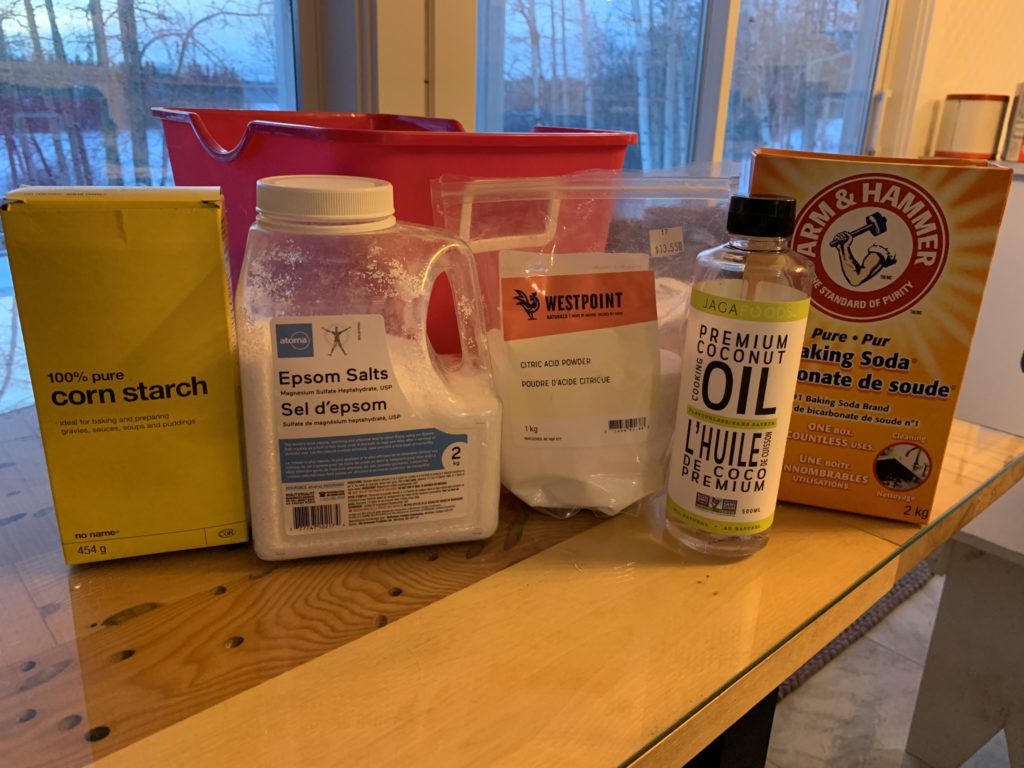
I have made them before, but the first time was a total gong-show. I have no idea what we did wrong, but they were a flop. This time, though, I attacked it calmly and confidently and all went well. I think they can sense fear. The recipe I found on Pinterest only made 2 bombs. Let’s face it. That’s just not enough for this girl so I doubled it. Then when those turned out I made another batch so I now have 10 beautiful, smelly, balls of goodness drying out just waiting for a chance to bubble and fizz in the tub.
They are surprisingly quick and easy to make at home and SO much cheaper than buying them in the store. I love Lush bath bombs but at $6.96 EACH there’s no way I can justify that. After I made these two batches of bombs I calculated out what they cost. The following prices are based on our local grocery store, which I think is grossly overpriced so they should be cheaper in other parts of the country/world!
1 cup baking soda $0.69
1/2 cup epsom salt $0.30
1/2 cup citric acid $2.03
1/2 cup corn starch $0.25
2 tbsp coconut oil $0.60
Total recipe $3.87, makes 5 bath bombs so they work out to $0.77 each! Yep, you read that right. $0.77 each. That’s just 11% of what a Lush bath bomb costs. And you can customize the scent to whatever you want! Score!!
Now they just need to dry for 24 hours and they’re ready for use!
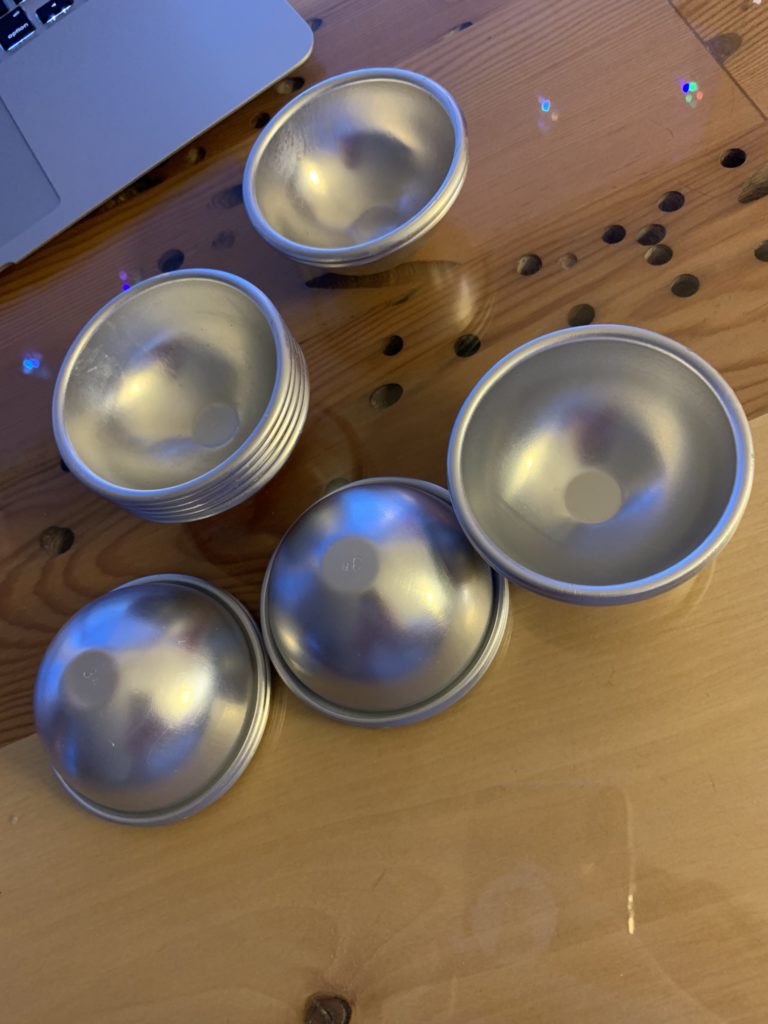
I already have lots of essentials oil and oil blends that I use for my candle making so I didn’t have to purchase any of those and as you only need a few drops (I used 10 drops of essential oils or a drizzle of my candle oil blends) it’s still so much cheaper than purchasing pre-made bath bombs. I purchased my bath bomb molds from Amazon a year or two ago.
Now the real trick is keeping them away from Maddie – the other bath person in the house!
Long time, no see everyone! I ended up taking the summer/fall/winter off from my blog to get some much needed renovations done on our home and to try to build my Hillside Farms brand a bit. I have been hosting woodworking classes each month up at the store and have been LOVING that.
But with the New Year quickly approaching, I have started thinking about what I want to accomplish in 2019. 2018 has been an incredible year, we bought our dream property and are turning our home into our dream home, our kids are all doing well, we are blissfully happy in our marriage, and since February the two of us have lost a combined total of about 115lbs. We feel happier, stronger, and lighter than we have felt in years, and although we are not done with our journey, we are well on our way.
I believe that the things in life that make us the happiest are when we are working towards a goal or dream, so that left me wondering “What can I do in 2019 to better our lives?” “What do I want to accomplish in the next 12 months?” “What 5/10 year goals do I have that I can work towards this year?” And together, we came up with a few answers. But I can’t reveal them all yet as they are still just dreams, with no concrete plans in place.
What I can let you in on though is that I have decided to dedicate the next 12 months to what I am affectionately calling “The Pinterest Project”. If, like me, you spend any free time you have scouring Pinterest for “the next big thing” then you know that it’s easy to pin projects, ideas, and recipes but how many do you actually do?? I have probably used about 20% of the pins on my boards.
20%
That’s a terrible number.
So I’ve decided that I am going to tackle 1 pin a week for the 52 weeks of 2019. Some weeks will be a woodworking project, some weeks will be a craft, some weeks will be something in the garden, and some weeks will simply be a new recipe.
I’m really looking forward to the next 52 weeks. The next 52 projects. With our home almost completely renovated and my office at the store in the middle of a renovation I need lots of new decor so finding projects to complete shouldn’t be too difficult!
I will post weekly after I have completed my project and let you all know if it was a successful project or not. I have seen several epic Pinterest fails so hopefully I don’t end up as one of them lol!!
Some of these projects will take longer than a week but I will post when it is complete.
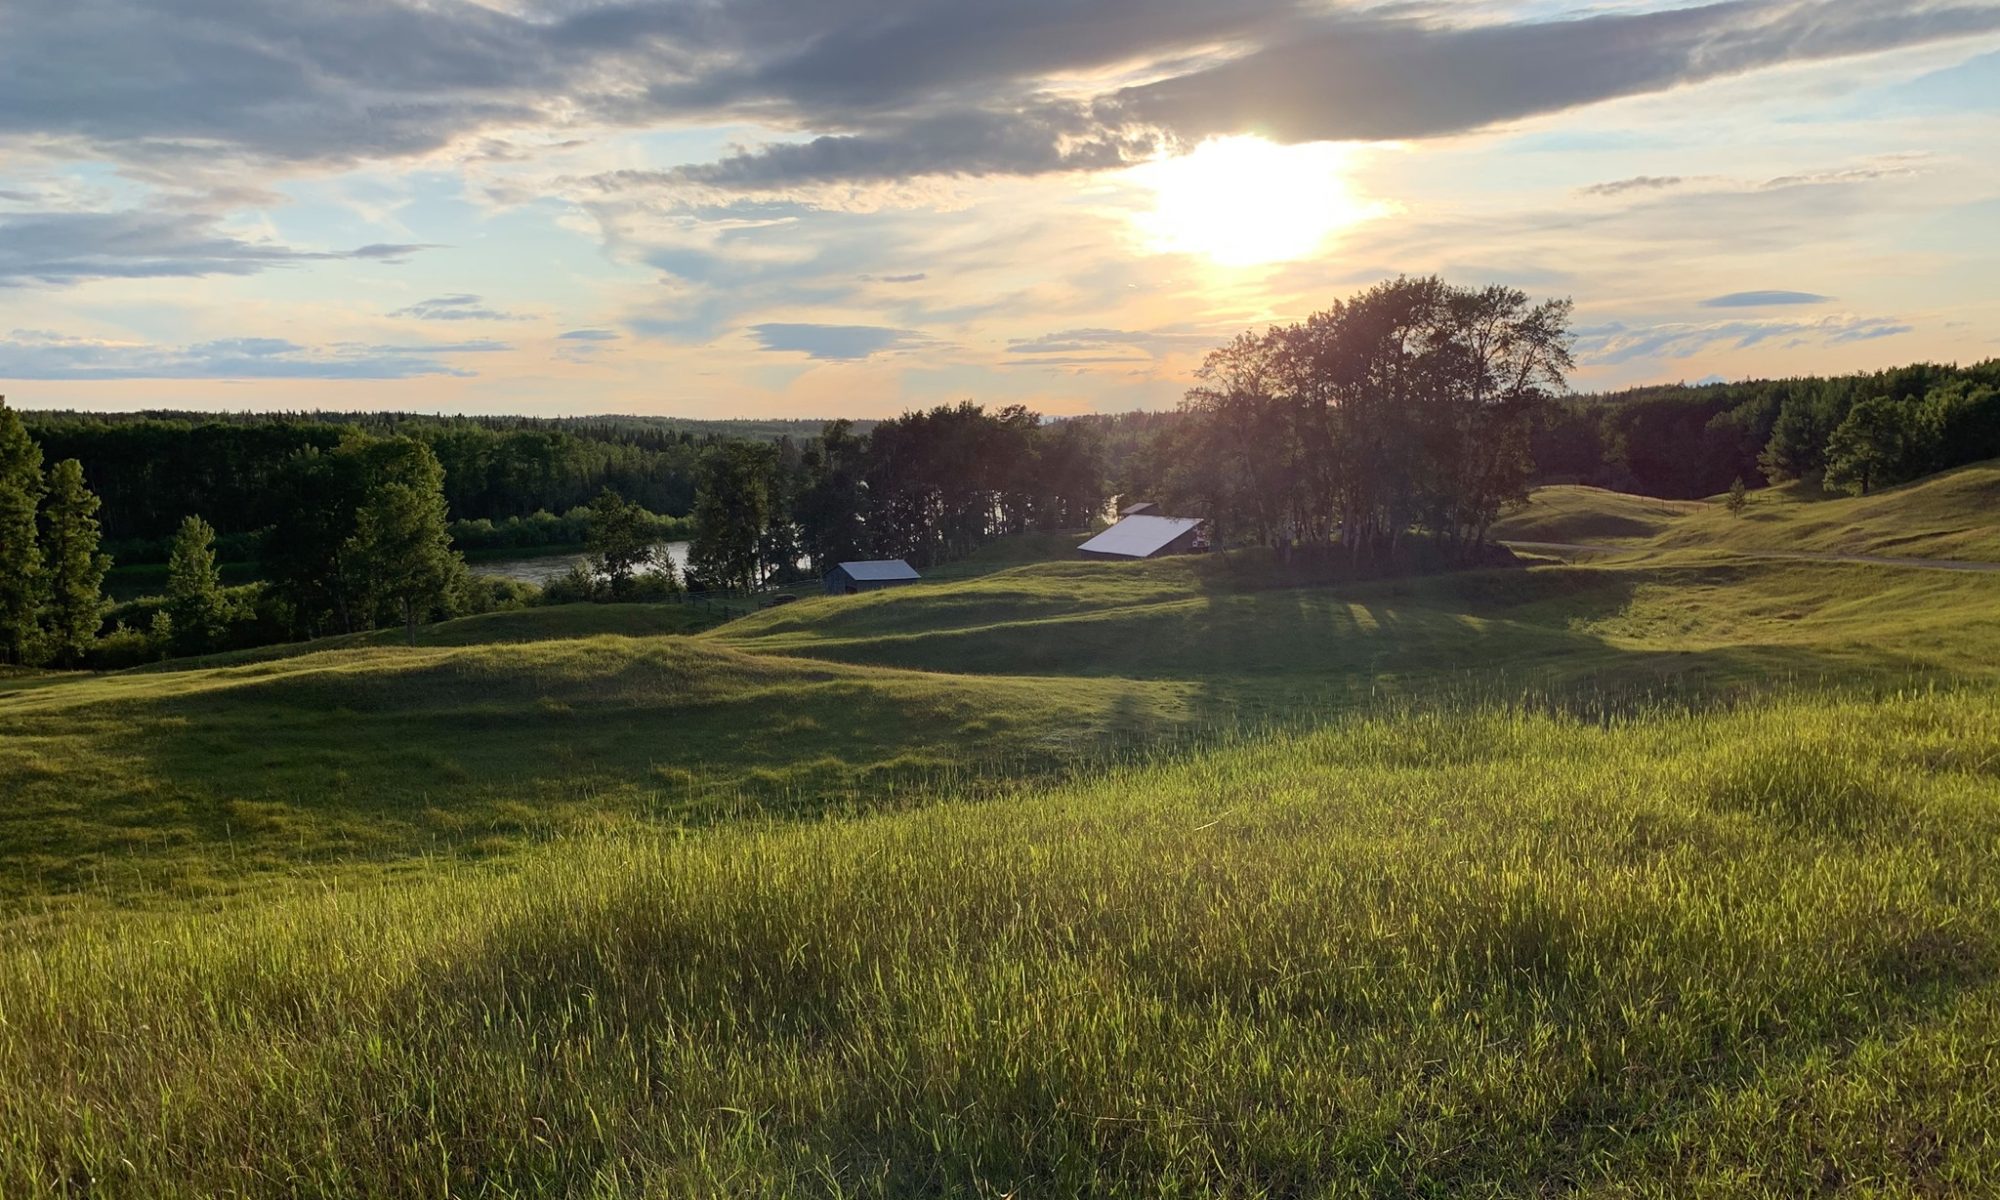
Hello all! Long time no talk! We finally have gotten moved into the river house, renovations are well underway, and we are feeling pretty settled in our new, more relaxed, life! I am loving the more relaxed pace around here, not that we are less busy, in fact, I think we are busier than ever, but just that everything seems less chaotic. It feels like there’s less of a strict schedule out here in the country and it’s taken me just over a month to get used to it!
I will have lots of posts for the future about our renovations but as none of our projects are actually finished yet they’ll have to wait! But today I wanted to talk about something that has had me thinking hard for the last couple of days.
Many of my Facebook and Instagram followers (and if you don’t follow me, why not? lol ;)) will know about my weight loss journey. We are following a ketogenic lifestyle and have been for the past 6 months. My husband and I are both down over 40 lbs each and feel great. I also go to a TOPS (Taking Off Pounds Sensibly) group meeting every Wednesday. I love my TOPS group. It’s an incredibly supportive and encouraging group of ladies who help lift each other and celebrate the victories. I’m not saying that every week is a victory for me, in fact, I have had more than a couple of weeks in the last 6 months where the number has gone up instead of down, but for the most part I have been incredibly proud of myself for my downward trend!
What struck me this week was that after our meeting one of the lovely ladies asked my mother-in-law if I was always that happy. I’m the loud out-going one of the group. My entire life I have been the loud, out-going one. I know my parents struggled when I was younger but have now embraced the obnoxious human-being I am lol! Anyway, I didn’t hear the exact response my mother-in-law gave but I know it was along the lines of “for the most part, yes!”.
Since that moment I’ve wondered “Am I always happy? If yes, what makes me that way? Aren’t most people happy?” I’ve been trying to observe people for the last few days, I spent the day Thursday with my mom at the Farmers Market and although I think a good lot of the population is happy, there are definitely some who show it more than others. The woman that runs the Farmers Market is one of those bubbly, always happy people. She clearly loves her life.
And you know what?
So do I!
I am genuinely happy. Happier than I’ve ever been, in fact. I don’t think I’ve ever been a miserable person (although my mom would probably have something different to say about my moody teenage years!) but I am genuinely, truly, incredibly content in our life.
I am very fortunate to have a great set of parents (the best, actually!), an incredible (and always hilarious-without-meaning-to-be) set of grandparents, a wonderfully loving set of in-laws, the worlds best husband (sorry ladies, he’s all mine!), and 3 truly great children. Each and every one of these people make my life better in ways I will never be able to tell them and I am grateful to all of them!
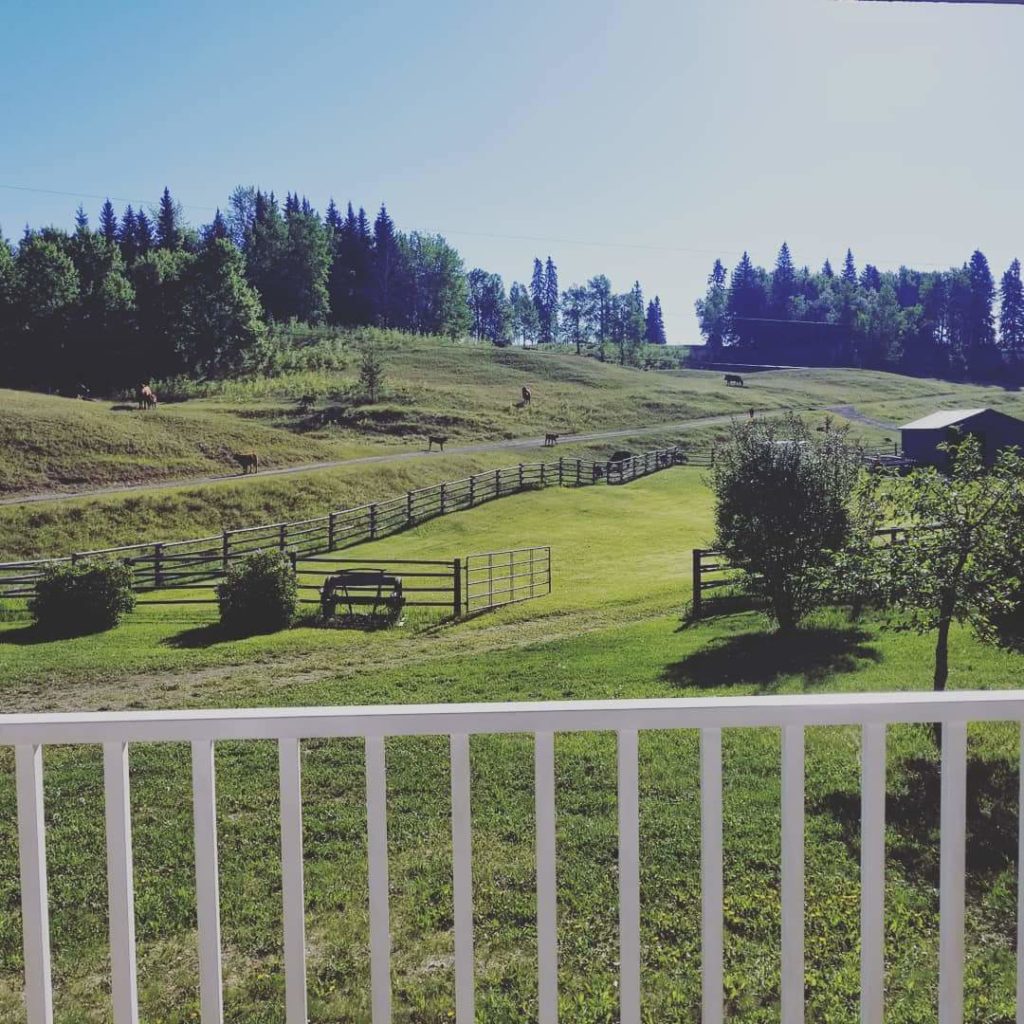
The beautiful view from our front porch always makes me smile!
We have a beautiful home and are lucky enough to be able to renovate ourselves. I love the process of renovating, less fond of the living in chaos during them, but totally worth it. I love learning how to do something new (yes I am guilty of watching hours upon hours of youtube videos to learn how to do something. I would never admit I don’t know how to do something!). I love the time spent in my garden, watching plants grow into something beautiful, or tasty, is one of my favorite things. I talk to my pumpkin patch every day. They are my “little darlings” and I hope to have some great looking pumpkins in time for fall!
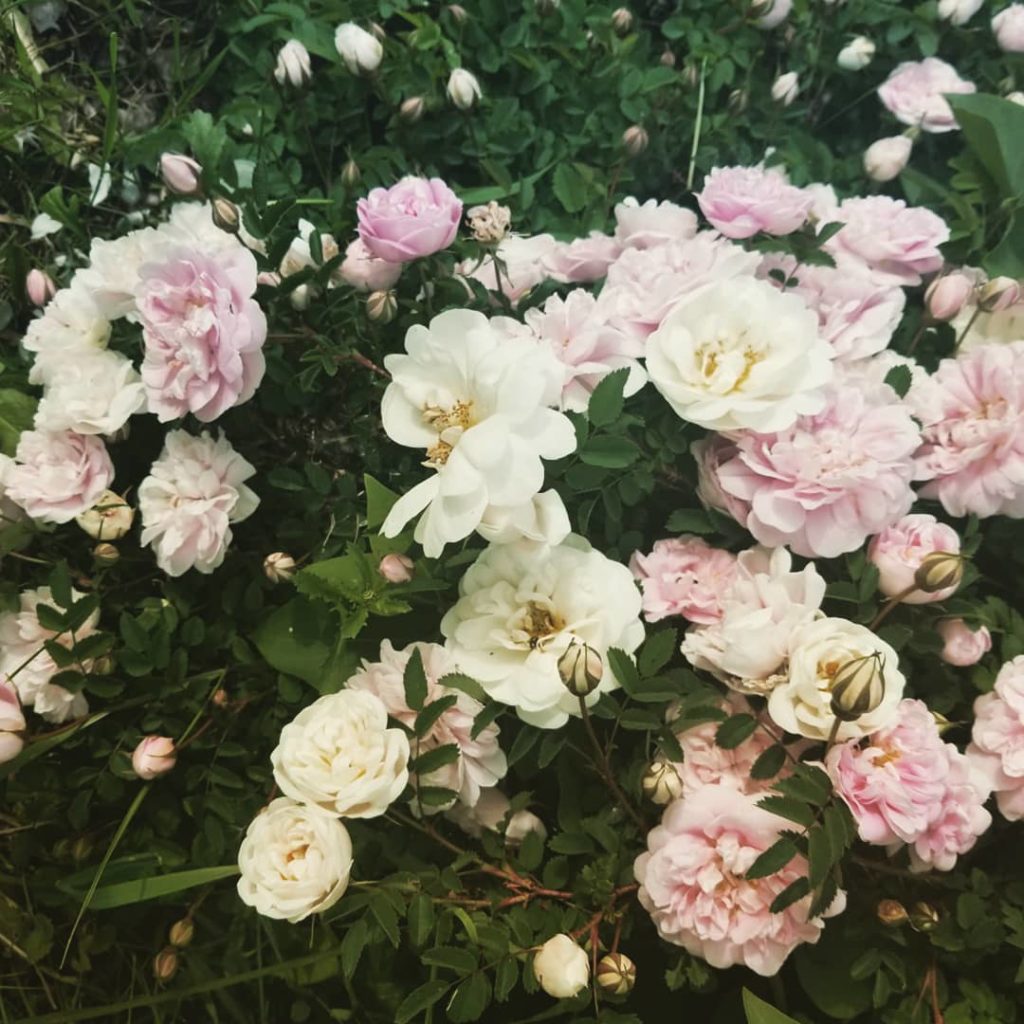
Roses are some of my favourite flowers!
I know that my confident, out-going, happy personality comes from my beautiful mother. She’s always happy, always laughing, and always brightens up any room. I also know that I have passed all of those traits on to my daughter, Maddie. She is, without a doubt, the happiest person I have ever met. No matter how much trouble she is in, how mad she has made us, how frustrated we are with her, she is ALWAYS singing and humming. I think I can count on one hand how many times she has been truly sad, or mad, in her 9 years. One look at her running through the sprinkler, or jumping on the trampoline, and I reminded that whatever little, trivial, thing I am worrying about means nothing.
Unless it’s raining if Maddie’s not in the house, this is where she is!
For the last year or so I have tried something I read about on Pinterest. Any time I am angry, frustrated, sad, about something I ask myself “Will this matter in 5 years?” 99% of the time the answer to that question is a huge NO! If it’s not something that will change your life for the worse, if it’s not something that will damage your family, if it’s not something that will even matter 5 years from now is it really worth worrying about??? It’s taken a long time to be able to do it successfully but now, when faced with something trivial I ask myself that question. If the answer is no, which is almost always is, I let it go. I take a deep breath, go for a walk if it’s really bothering me, have a long soak in a hot bath, a glass of wine (lets be honest, it’s more likely to be a gin and tonic!), and just let it go. It’s not worth it.
I’ve also let go of all of the hate. Hate is an ugly word. I don’t think there has ever been someone that I truly hate, but there have been more than a few people I have a strong dislike for. But they’re not worth it either. Again, it’s taken me a long time, but I truly feel like I have let go of all of it. I have mentally forgiven those I feel have wronged me. I’m choosing to focus on the good and it has made all of the difference in the world!
My aunt recently attended a birthday party for a woman she knows who just turned 100! 100 is an incredible feat, and I am so proud to have had a Nana who also made it to 100 before passing away shortly after her birthday. During this birthday party people wanted to know her secret to living so long. Do you want to know what she said? She said she never said a bad word about anyone, she never let people get to her. She let things slide off her back like a duck.
People like her are who I aspire to be.
I take it day by day, hour by hour, minute by minute. I try to participate in activities with my daughter that will stick with her. I want her to think back to her childhood and remember the fun, happy, times we had together. The things we did together. The things I took the time to teach her. And during these times I learn so much from her.
The happiest person I have ever met! She inspires me every single day!
When life gets difficult, put the sprinkler under the trampoline, turn it on, and bounce all of your cares away. Even just watching her, or listening to her through the kitchen window, puts a smile on my face and reminds me that life is beautiful. Life is too short to sweat the small stuff. We are given one life, make it a happy, fun, loud, obnoxious, carefree one!
Live like someone left the gate open, find something you love and do it often, dye your hair a crazy colour and be unapologetic about it. Just do you. Other peoples opinion don’t matter! I truly think that’s the trick to true happiness. No longer worrying about what others think. If you love yourself everyone else will love you to! Try it! I promise you won’t be sorry!
I have had pink hair for the last few months and I don’t think I’m ever going back! I LOVE the pink hair!
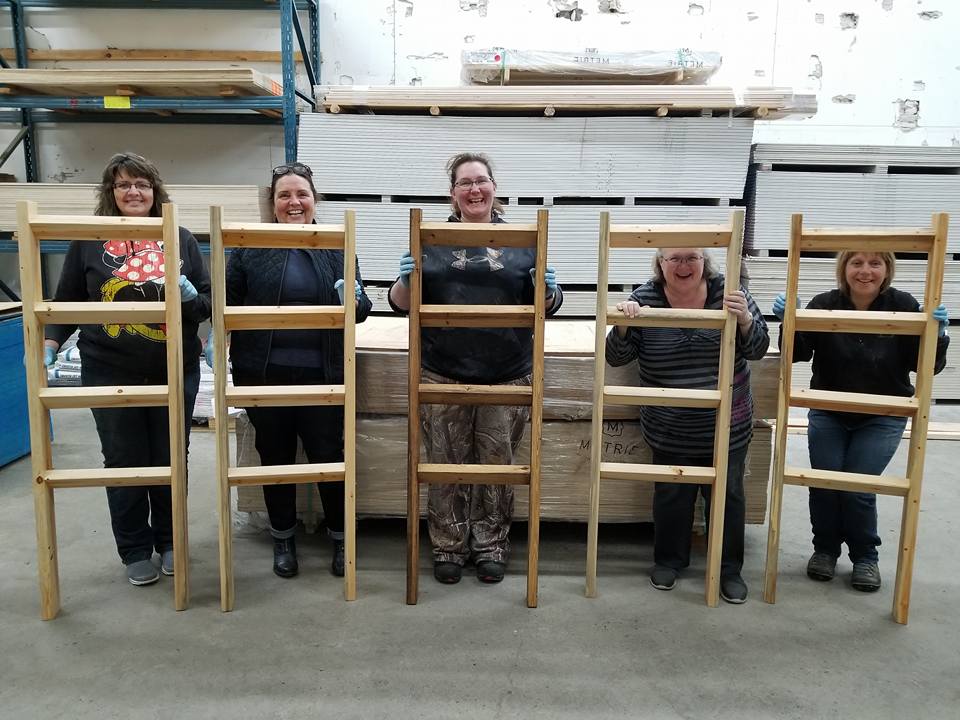
Look at those happy smiling faces! So proud of their beautiful projects!
I’ve never been shy in front of other people, I think it’s from the years of 4-H when I did public speaking and demonstrations. I’ve always enjoyed getting up in front of others and giving a talk about something, or showing someone how to do a craft. Or maybe it’s part of my narcissistic personality. I like to be the centre of attention. Whatever it is, I wouldn’t change it. The confident (sometimes cocky), outgoing, independent person I am is who I am happy being.
I used to worry what other people thought about me. I used to worry that I wasn’t someones cup of tea. I used to worry I would grow up to have no friends. I don’t know when that changed for me. All I know is that it did.
The way my close friends and family see me is obviously still important but not so important that I’m willing to change the key components of who I am to suit them. I am loud. I am occasionally arrogant. I am a smart ass. I love to be challenged. And I’m ok with that.
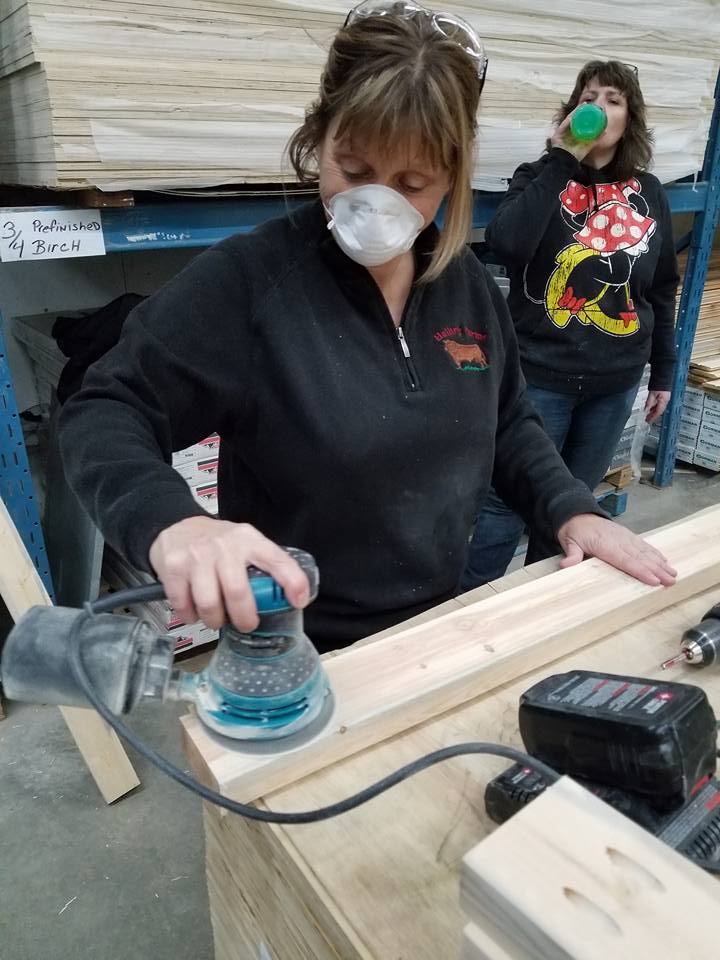
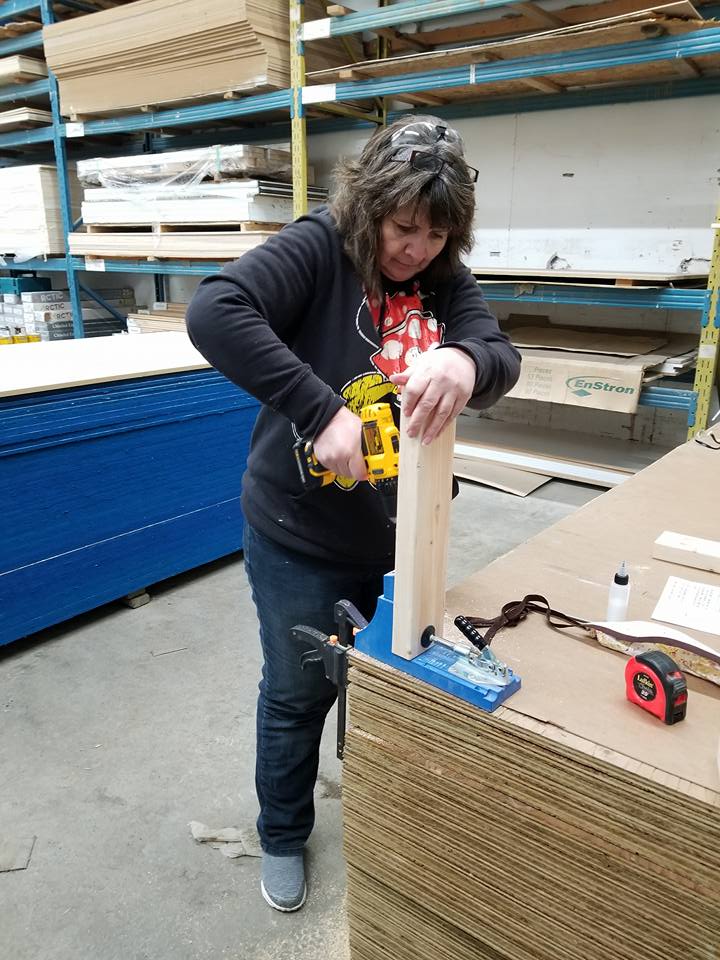
So when Rex mentioned that I should hold some classes at the store I was all over it! I could showcase some of my favorite projects. I could empower some women to use some basic woodworking tools. I could talk and people would listen to me lol. Perfect! So I settled into my computer and got to work scheduling my first class; a blanket ladder.
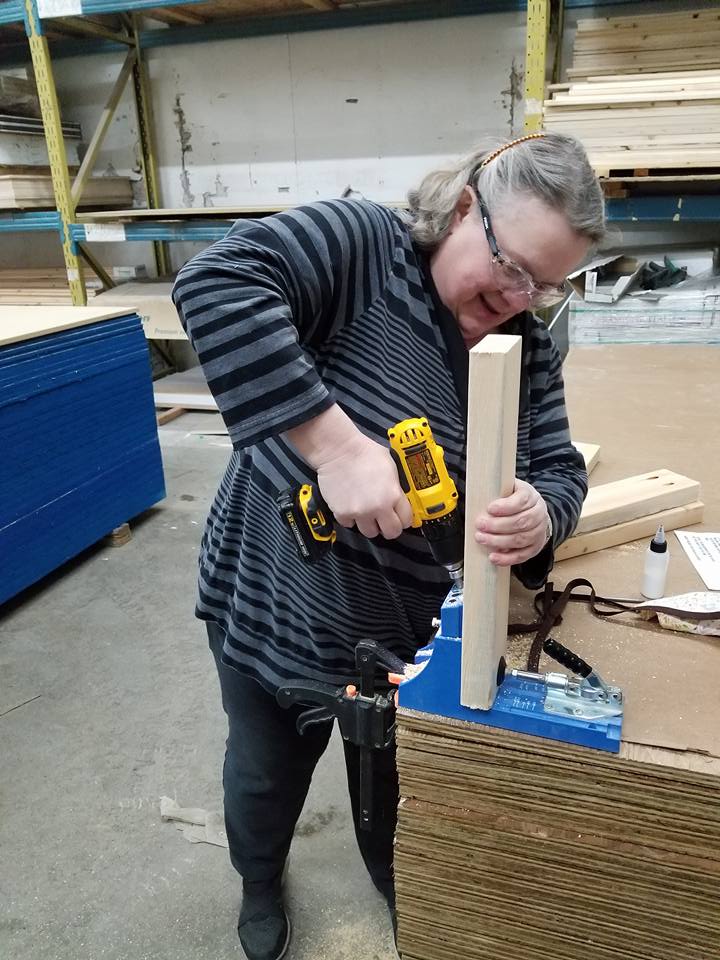
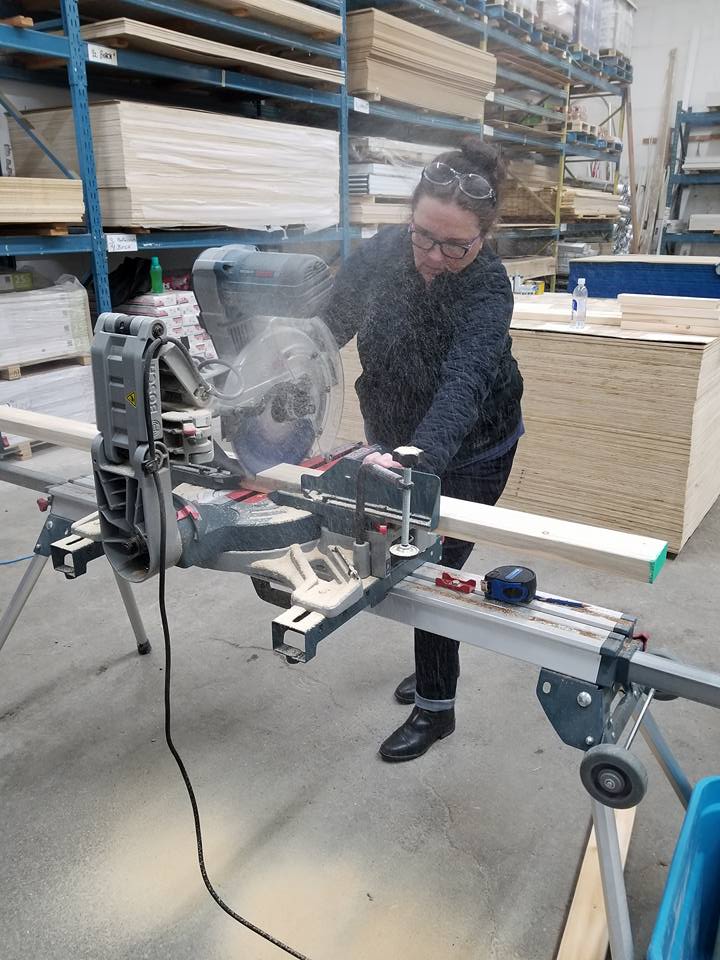
Blanket ladders are the perfect beginner woodworking project. They require only a few basic tools, a few basic pieces of lumber, and they’re relatively simple to put together!
Filled with excitement I posted that first advertisement for my class on Facebook and had my fingers crossed I would get some interest. And I did! I had the 6 spots in that class filled before the day was out! Awesome!
In the weeks leading up to the class I put together some instruction sheets for everyone, got together all of the supplies I needed and went through the evening in my head dozens of times. When the big night came, I was ready.
I was very fortunate I had a great group of ladies attend this first class, most of whom had never operated any woodworking tools before. Their husbands owned all of the tools but they had never ventured into the shop themselves and “had a go”.
By the time the evening was through everyone had a beautiful blanket ladder that they were extremely proud of. And I was proud of each and every one of them. None of them hesitated to use the saw, the drill, the sander, none of it!
And all of them left with all 10 fingers! Win win!!
So today I sit at my computer at the kitchen table (my office is just too cramped to feel creative there!) and work on the schedule for the next classes! I posted my photos from last night on Facebook today and they were so well received I know I won’t have a problem filling the next ones!
As I type this I am sitting on the plane on the way home from Las Vegas. I love Vegas. I love the lights. I love that the city never sleeps. I love that there is so much to do you are never bored. I love how easy it is to fulfill my step count. But after 3 or 4 days I am always so happy to leave. It’s exhausting. And my feet hurt.
When I pack for Vegas I always pack pretty shoes for when we go for dinner and a show. The reality is I have never, in the 4 times we have been, worn them. It’s just too much walking to wear anything other than a pair of Sketchers or my trusty so-well-worn-in-they-are-falling-apart boots. But I continue to pack them. Maybe one day I’ll actually wear them.
In October my Dr. found some really high liver enzymes on some bloodwork he ran so he put me on a low carbohydrate diet. I have a friend who is also a Dr. and I did the bad friend thing and asked her for advice as well (my family Dr. is new and I wasn’t sure yet how I feel about his recommendations!). She suggested I make a switch to a keto diet and check out www.dietdoctor.com I fully trusted her advice however the thought of switching to a diet that is 70% fat went against everything I had ever known. So after some research I settled on the Paleo diet instead, which is grain free, sugar free, dairy free.
I didn’t find the switch too difficult as we don’t eat breads, pastas or potatoes very often. In the following few months I lost about 20lbs and I actually felt so much better. A lot of my bloating was gone, I had more energy, I wasn’t hungry. As much as I liked the Paleo diet I knew there was something else out there that was similar but had a few others tweaks that would better suit me and my body. After A LOT of research I decided I would give Keto a try. I follow a few keto lovers on Instagram and @ketoincanada totally inspired (and continues to inspire) me!
The Ketogenic diet is low carb (less than 25grams/day in most cases), moderate protein, and high fat. 70% of your day is fat. Bacon? A terrible idea on most conventional diets, a perfect food on Keto? Hmmmm, maybe these people are onto something. So during the first week of February I made the switch.
I tried the Atkins diet years ago when it first came out and it’s quite similar to Keto. I didn’t enjoy it the first time round, I kept cheating. But that’s the thing about the keto diet, if you cheat, it doesn’t work (although that’s true for most diets!). Eating low carb and high fat trains your body to find it’s energy supply in your fat instead of glycogen (which your body gets from carbs and sugars). Your body becomes a furnace and burns your body fat, even when you don’t exercise (of course exercise is essential, and so therapeutic!). Once your body is in ketosis and burning the fat it’s a pretty low maintenance system. You have more energy, your skin becomes so much smoother, there’s no bloated feeling after eating and, honestly there is TMI coming here, my bowels have never worked better. I have struggled my whole life with my guts. They seem to bloat and get that ugly, uncomfortable feeling no matter what I ate. Until I went Keto.
I’m not saying it’s for everyone. I’m not saying everyone should jump on the Keto wagon (although there are a lot more people taking that plunge now!), I’m just saying this is working for me! I feel 100% better. So much so that my husband has committed to making the switch as well.
Vegas is a difficult town to eat well in but, other than a few meals that I intentionally catapulted myself off of the wagon, I managed to keep it Keto. It’s actually much easier than I thought it would be. I have always been one of those people who hated to ask for foods to be prepared differently, or substitutions made, but I did it this trip.
And you know what happened?
Waiters, waitresses, and baristas were all more than happy to oblige and not one of them rolled their eyes at me!
I kept track of what I ordered and consumed at each meal as I thought a few of you might be curious. If you don’t care what I ate during my week in Vegas just skip ahead. I promise I won’t be offended!
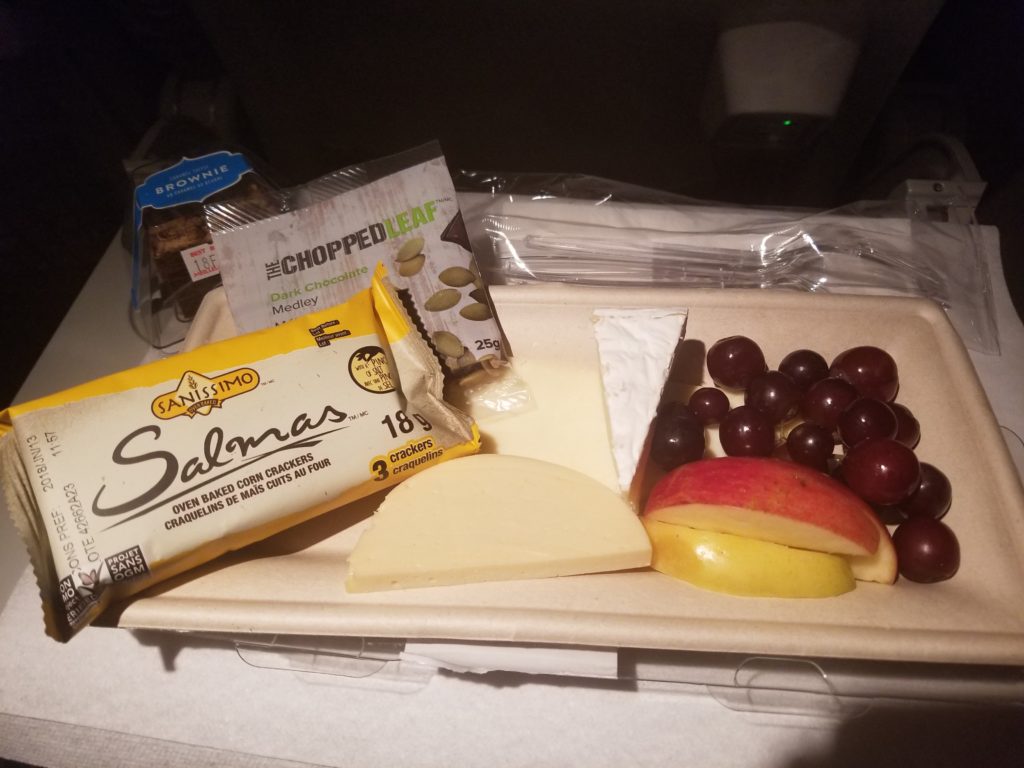
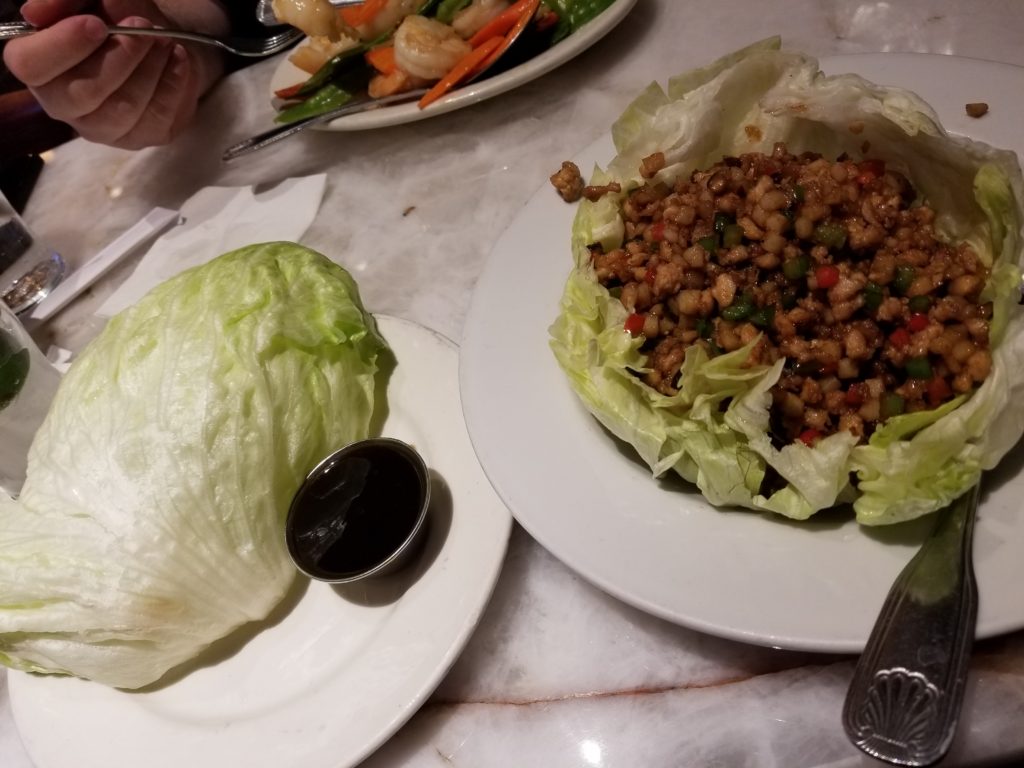
Monday – this was a travel day for us, we had an hour drive from our house to the airport, an hour flight from Prince George to Vancouver. Then a 3 hour layover in Vancouver before another 2 1/2 hour flight to Vegas. When we got to Prince George our first stop is always Starbucks. This was a hard one for me. I don’t like my coffee black, although it’s growing on me, but over the last few weeks I have researched on what I could have and have settled on a Grande Blonde Americano with 2 pumps of sugar free cinnamon dolce syrup (0g carbs!) and a splash of heavy whipping cream (also 0g carbs!). We had lunch at Red Robin before we went to the airport and I had a Wedgie burger, which is a burger patty with cheese and avocado and regular fixings inside of a lettuce wrap instead of a bun, and a side of broccoli.
On the plane was difficult but I settled on a cheese plate. There were 3 different types of cheese, a package of crackers, a little bag of trail mis made with sunflower seeds, dark chocolate, and dried cranberries, and a couple of apple slices and grapes. I ate the cheese, gave the crackers to my husband, picked the cranberries out of the trail mix as they were sweetened with sugar, and ate the fruit. Less than ideal but a drastic improvement over what I would normally have consumed!
Once we arrived in Vegas and got checked into the hotel it was 10pm and we needed some supper. We went to the Hard Rock Cafe and I had chicken fajitas with lettuce wraps instead of tortillas. Fajitas are a decent choice as they come with lots of extra fats in the form of guacamole and sour cream! Yum! Because it was supper time and I was in Vegas I wanted something other than water to drink so I had a club soda with a couple of limes. It’s my favorite go-to drink when I want to feel fancy. And it’s 0g carbs!
A pretty decent meal/snack for the airplane! See that sneaky little treat in the top left corner? That’s a brownie. And I didn’t even open it!
Chicken Fajitas at Hard Rock Cafe
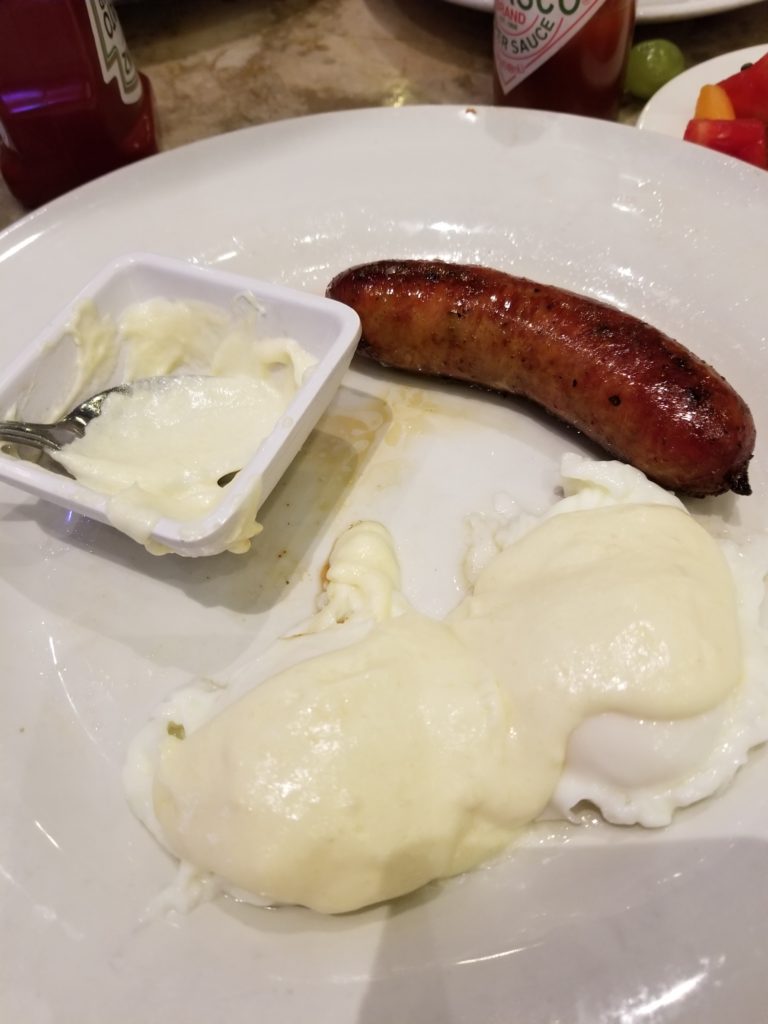
Tuesday – we usually stay at New York New York and there are lots of good restaurants in our hotel. One of them has a buy one breakfast, get one free for hotel guests so we went there (more money for the slot machines!). All of the breakfasts came with fresh, warm homemade bread and fried potatoes and onions but I did the responsible thing and ordered 2 eggs soft poached, with sausage, and told them no potatoes or bread! Oh, and I added a side of hollandaise sauce cause that’s how Keto rolls! It was really good and kept me going for hours. Then another stop at Starbucks before hitting the Strip.
For lunch we went to Bubba Gumps. I had never been to one before! I loved it! And I scored 100% when our waitress quizzed me about Forrest Gump trivia. I ordered shrimp kabobs (which was just shrimp, peppers, and zucchini), and a side of broccoli. It was really really good! I would highly recommend, even if you’re not on a Keto diet!
Supper was back at our hotel in a really good Asian restaurant called Chin Chin. I had wonton soup for starter but gave Rex all of the wontons (yep that pretty much means I had a bowl of broth with a few chunks of chicken but it was really good!). Then I had lettuce wraps for supper. They were also really really good. I would definitely have it again! I had club soda with limes and a lemon just to mix it up a bit (or cause Rex threw his lemon in!).
Not pretty to look at but tasted really really good!
Where would I be without this little green mermaid?
Shrimp kabobs are Bubba Gump
Club soda with limes and a lemon
Wonton soup without the wontons is really just broth, some chicken, and a few pieces of spinach.
These lettuce wraps were SO good! The mixture was chicken, mushrooms, water chestnuts, some peppers and some hoisin type sauce.
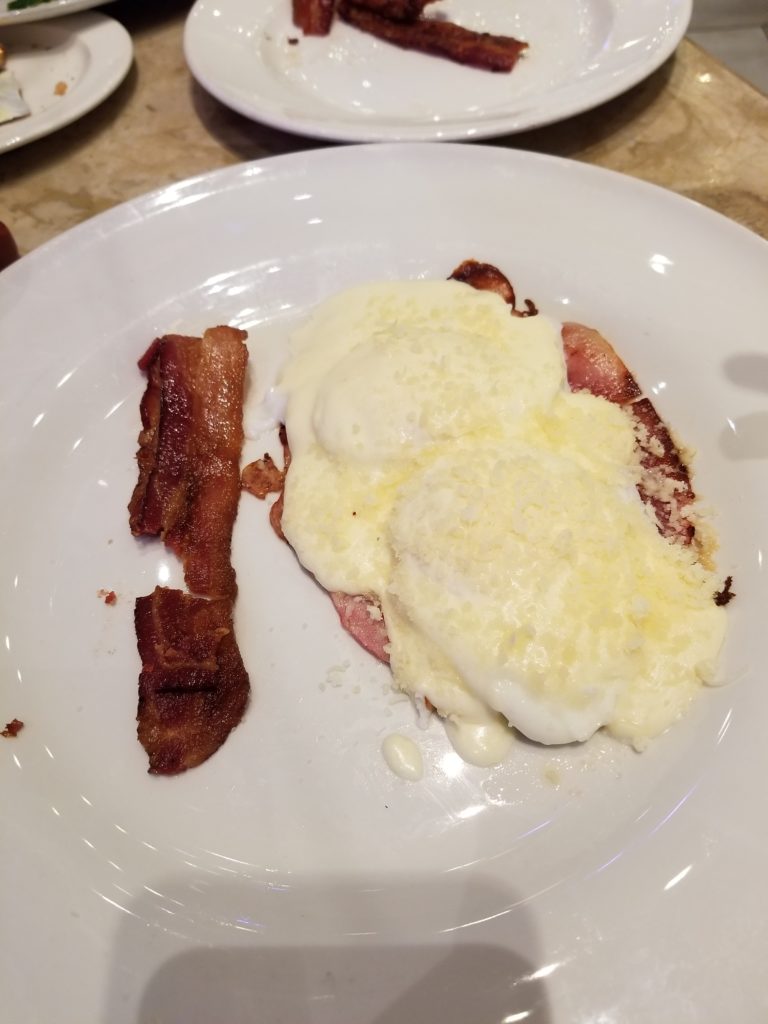
Wednesday – breakfast at our hotel again. This day I had eggs Benedict without the English muffin and potatoes, with a side of bacon. Then Starbucks again (I have a Starbucks problem!). We love to road trip so we took this day to rent a car, get out of the city, and do some exploring. It was a beautiful day and we thoroughly enjoyed ourselves. Rex has been on the lookout for a Claim Jumper restaurant for the last few years and we found one in Laughlin. For lunch I ordered a chicken club wrap without the wrap. I will confess I got a funny look from the waitress for this one but I just asked her to pile it all on a plate and they did. I got a big bowl full of diced chicken, bacon, lettuce, cheese, avocados, and ranch dressing. I had Thai peanut slaw on the side which, to be honest, I suspect had sugar in it but I ate it anyway. Then the day went south…Golden Corral. Golden Corral has been a favorite of ours since that first fateful day about 5 years ago when my in laws took us when we visited them in Arizona. I don’t know why but we LOVE Golden Corral. We had no intention of misbehaving but obviously the Golden Corral gods heard we were in town and they sucked us in. When it was merely a suggestion I had full intentions of eating Keto there. It’s definitely possible. But then I walked through those doors and that was that. But don’t worry. I suffered. I suffered all night long. Did we learn our lesson? I’d love to say yes but honestly I doubt it. Good thing we’re usually only south of the border once a year!
Eggs Benedict is one of my favorite foods, so glad we still get to enjoy it!
Grande Blonde Americano with 2 pumps Sugar Free Cinnamon Dolce and some heavy cream
Chicken club wrap sans wrap!
*sigh* oh Golden Corral
Thursday – after a long, uncomfortable night from our pig-out neither one of us wanted a real breakfast so we just each grabbed a cheese stick at Starbucks to eat with our coffee. We had booked a tour for this morning so we walked to the Rio for pickup which is 2 miles. We could have taken a cab but it was our redemption for the prior evenings pig-out. Part of our tour was lunch at Danny “The Count” Kokkers restaurant Vamp’d. I had a buffalo chicken salad (no breading on the chicken) and it was really good! I’m going to try to recreate it at home! Danny Kokker also has a tattoo shop in the Rio so we went to have a look and I ended up getting a bright colourful water-colour tattoo down my whole forearm so that took all afternoon! After I was done we had a few hours to kill before our show so we headed to Outback for supper. Rex had never been to an Outback and he wanted to try it. I had parmesan crusted chicken with broccoli. It was pretty good and pretty keto compliant but the blooming onion we had as a starter most definitely wasn’t. It was at this point that I decided I was getting serious when we got home and if I had already thrown myself out of ketosis I should at least enjoy a hot fudge sundae one last time. So after our show that’s exactly what I did. Sorry there is a noticable absence of photos from today, not sure what happened!
I LOVE my new artwork. 3 origami birds to symbolize our 3 children
Friday – our travel home day. We had breakfast at our hotel again, I had 2 poached eggs and sausage. Then one last Starbucks for a while (the closest one to us is an hour away). On the plane I had a Baja bowl which was chicken and veggies with salsa and sour cream. There was rice in it but at that point I couldn’t pick it out so ended up eating most of it. When we finally arrived back in Prince George it was 8pm and we were starving so we hit Earls and we split an order of Dynamite rolls and I had a California chicken burger without the bun with a field greens salad on the side. Again, no photos from today’s food. Wow, 2 out of 5 days with no photos, I really failed lol!
So as I sit here in this plane seat, the guy in front of me who has his seat reclined all the way and the guy behind me who keeps slamming his tray and kicking my seat, politely turning down the flight attendant every time she tries to offer me something to eat, I am planning our meal plan for the next 7 days and thinking about how much better we will both feel.
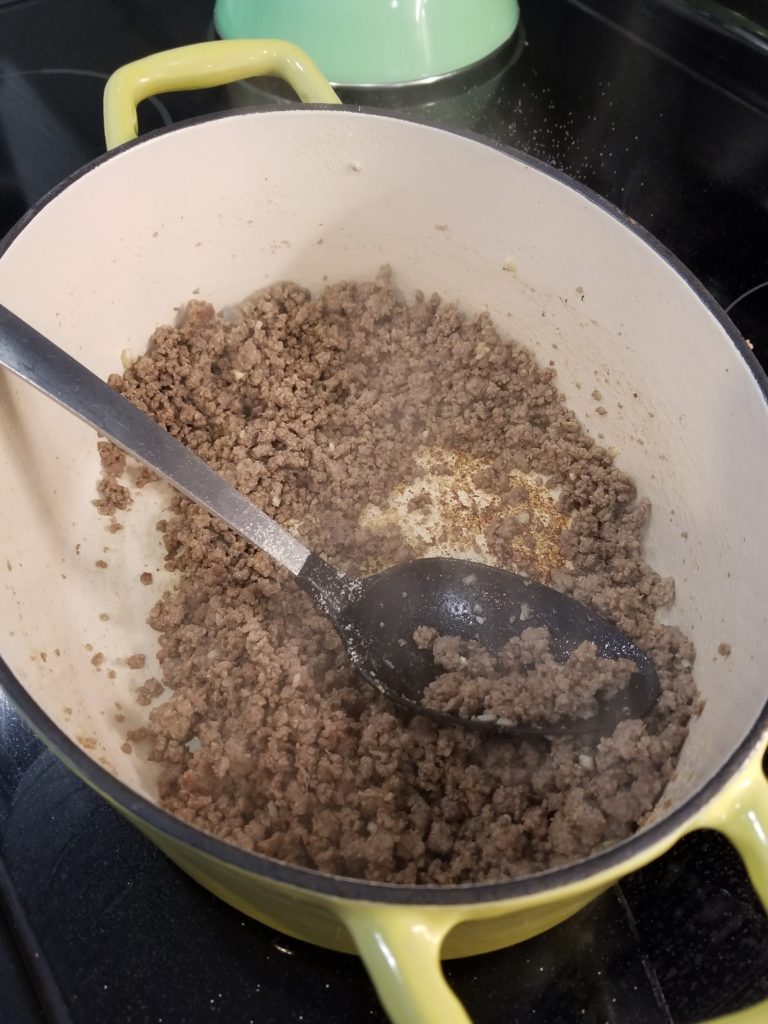
As usual, I got distracted mid afternoon and forgot to get supper started at a reasonable hour. So once again I was faced with making something in a hurry. I had taken a package of ground beef out of the freezer yesterday so I knew it would be something with beef, but what? Usually my fall back was always spaghetti. It’s quick, everyone likes it, and it’s easy. But I really wasn’t craving spaghetti.
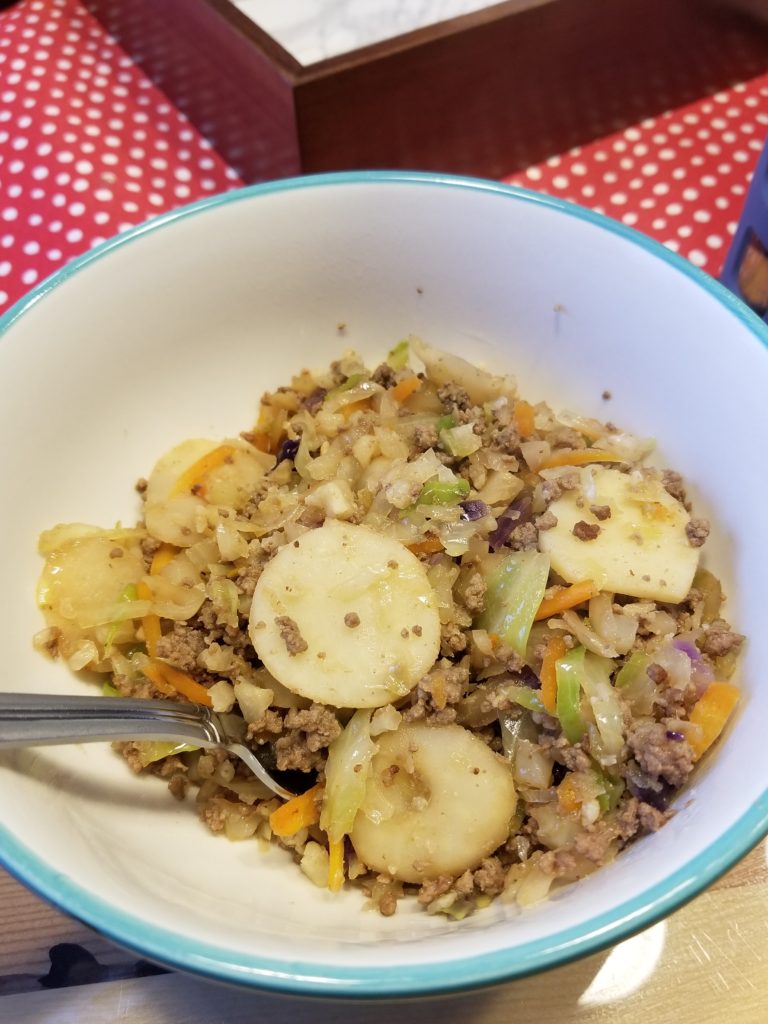
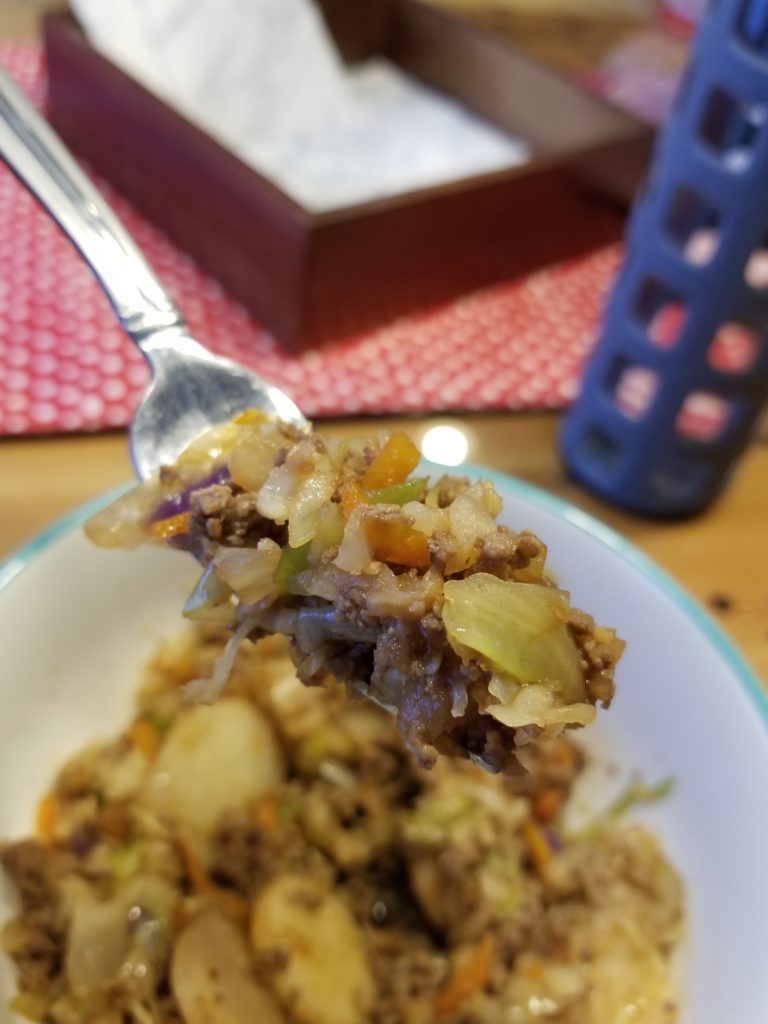
We leave for Vegas in a couple of days so I really should use up some of the things in the fridge so they don’t spoil while we’re gone. Ah ha! I know what we’ll have! Eggroll in a bowl!
I LOVE egg roll in a bowl. It’s delicious and salty and comforting. It makes you feel like you’ve just cheated and eating a decadent meal, but it is completely keto!
But better than that, it’s quick! Super quick! And also super easy, no chopping, no prep work. What could be better?
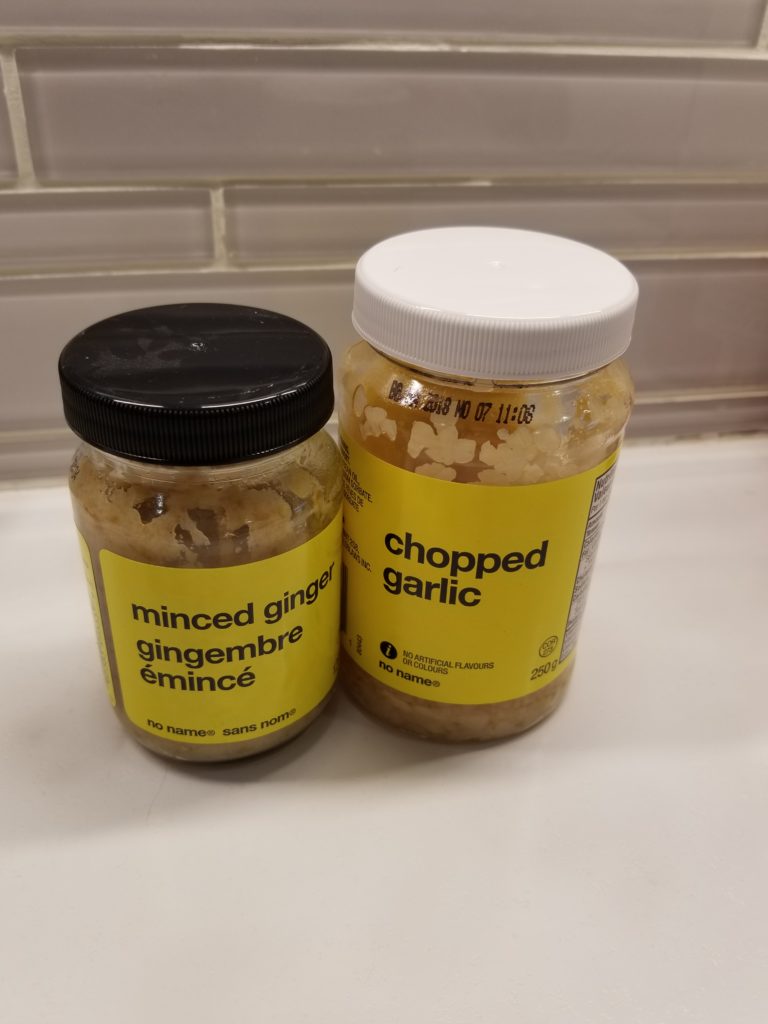
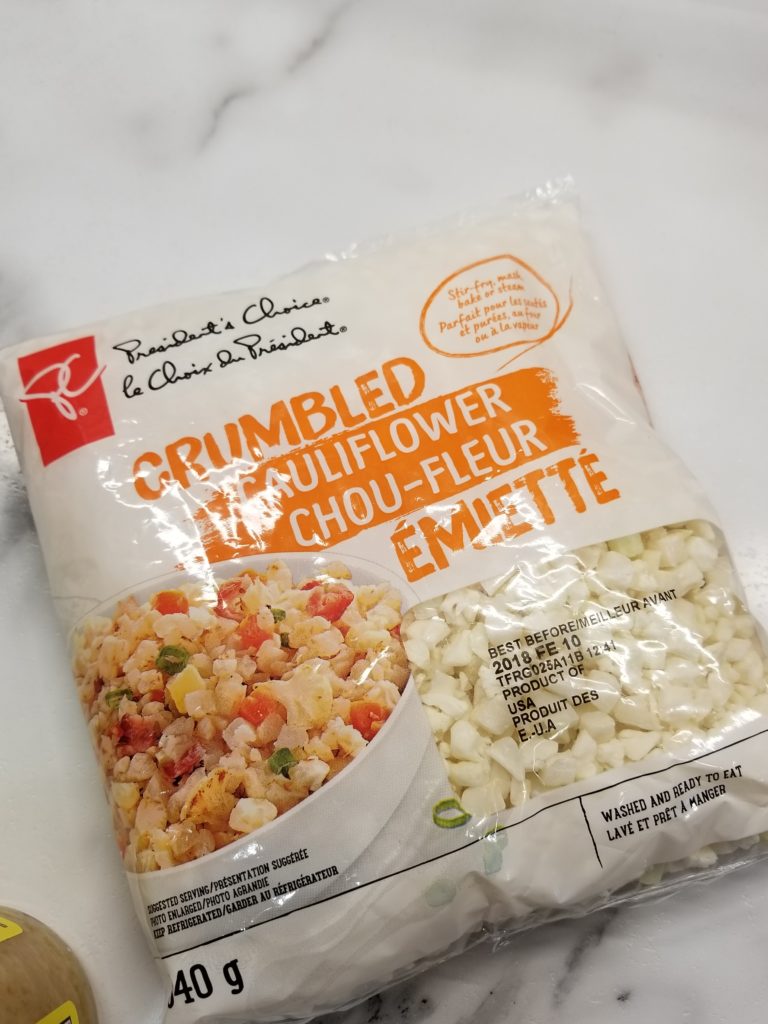
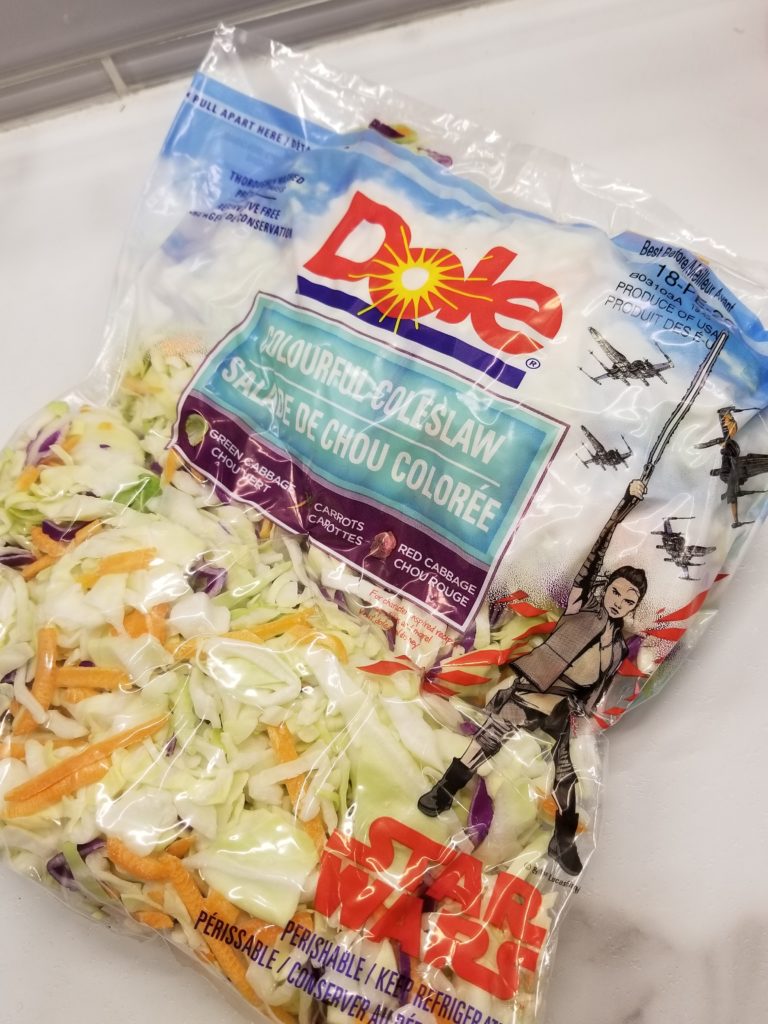
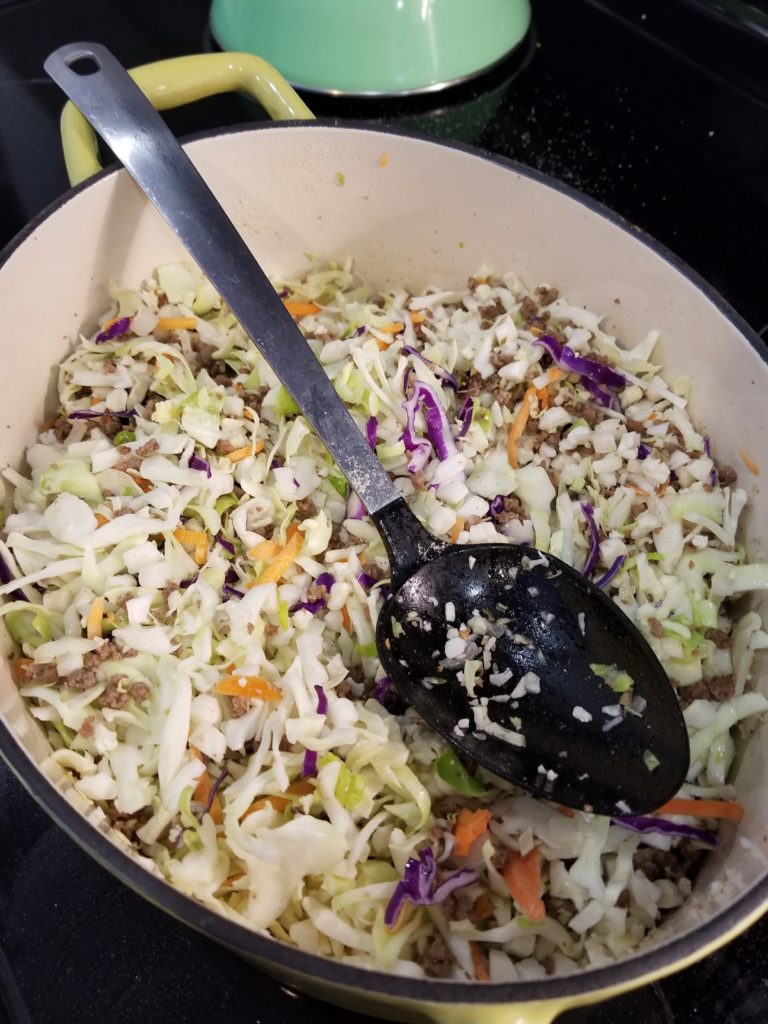
I started by browning the ground beef. I have made it a few times with ground pork but in our opinions it really is just better with beef. Once the beef was browned I added some minced garlic, minced ginger and some sesame oil. I usually give that a couple of minutes for the garlic and ginger to cook a bit, then I add a bag of coleslaw mix and a bag of cauliflower rice.
We almost always have a bag of coleslaw mix in the fridge. When they go on sale I buy a couple of bags. They are a super quick way to make a stirfry, or this delicious recipe!
Then I added about 3/4 cup of beef stock and put the lid on and let the veggies steam a little bit. Once they are cooked the way we like them I added a little bit of soya sauce and a can of drained water chestnuts. Once the water chestnuts are warmed through it’s ready to serve!
Voila! Super easy! Super fast! And super delicious!
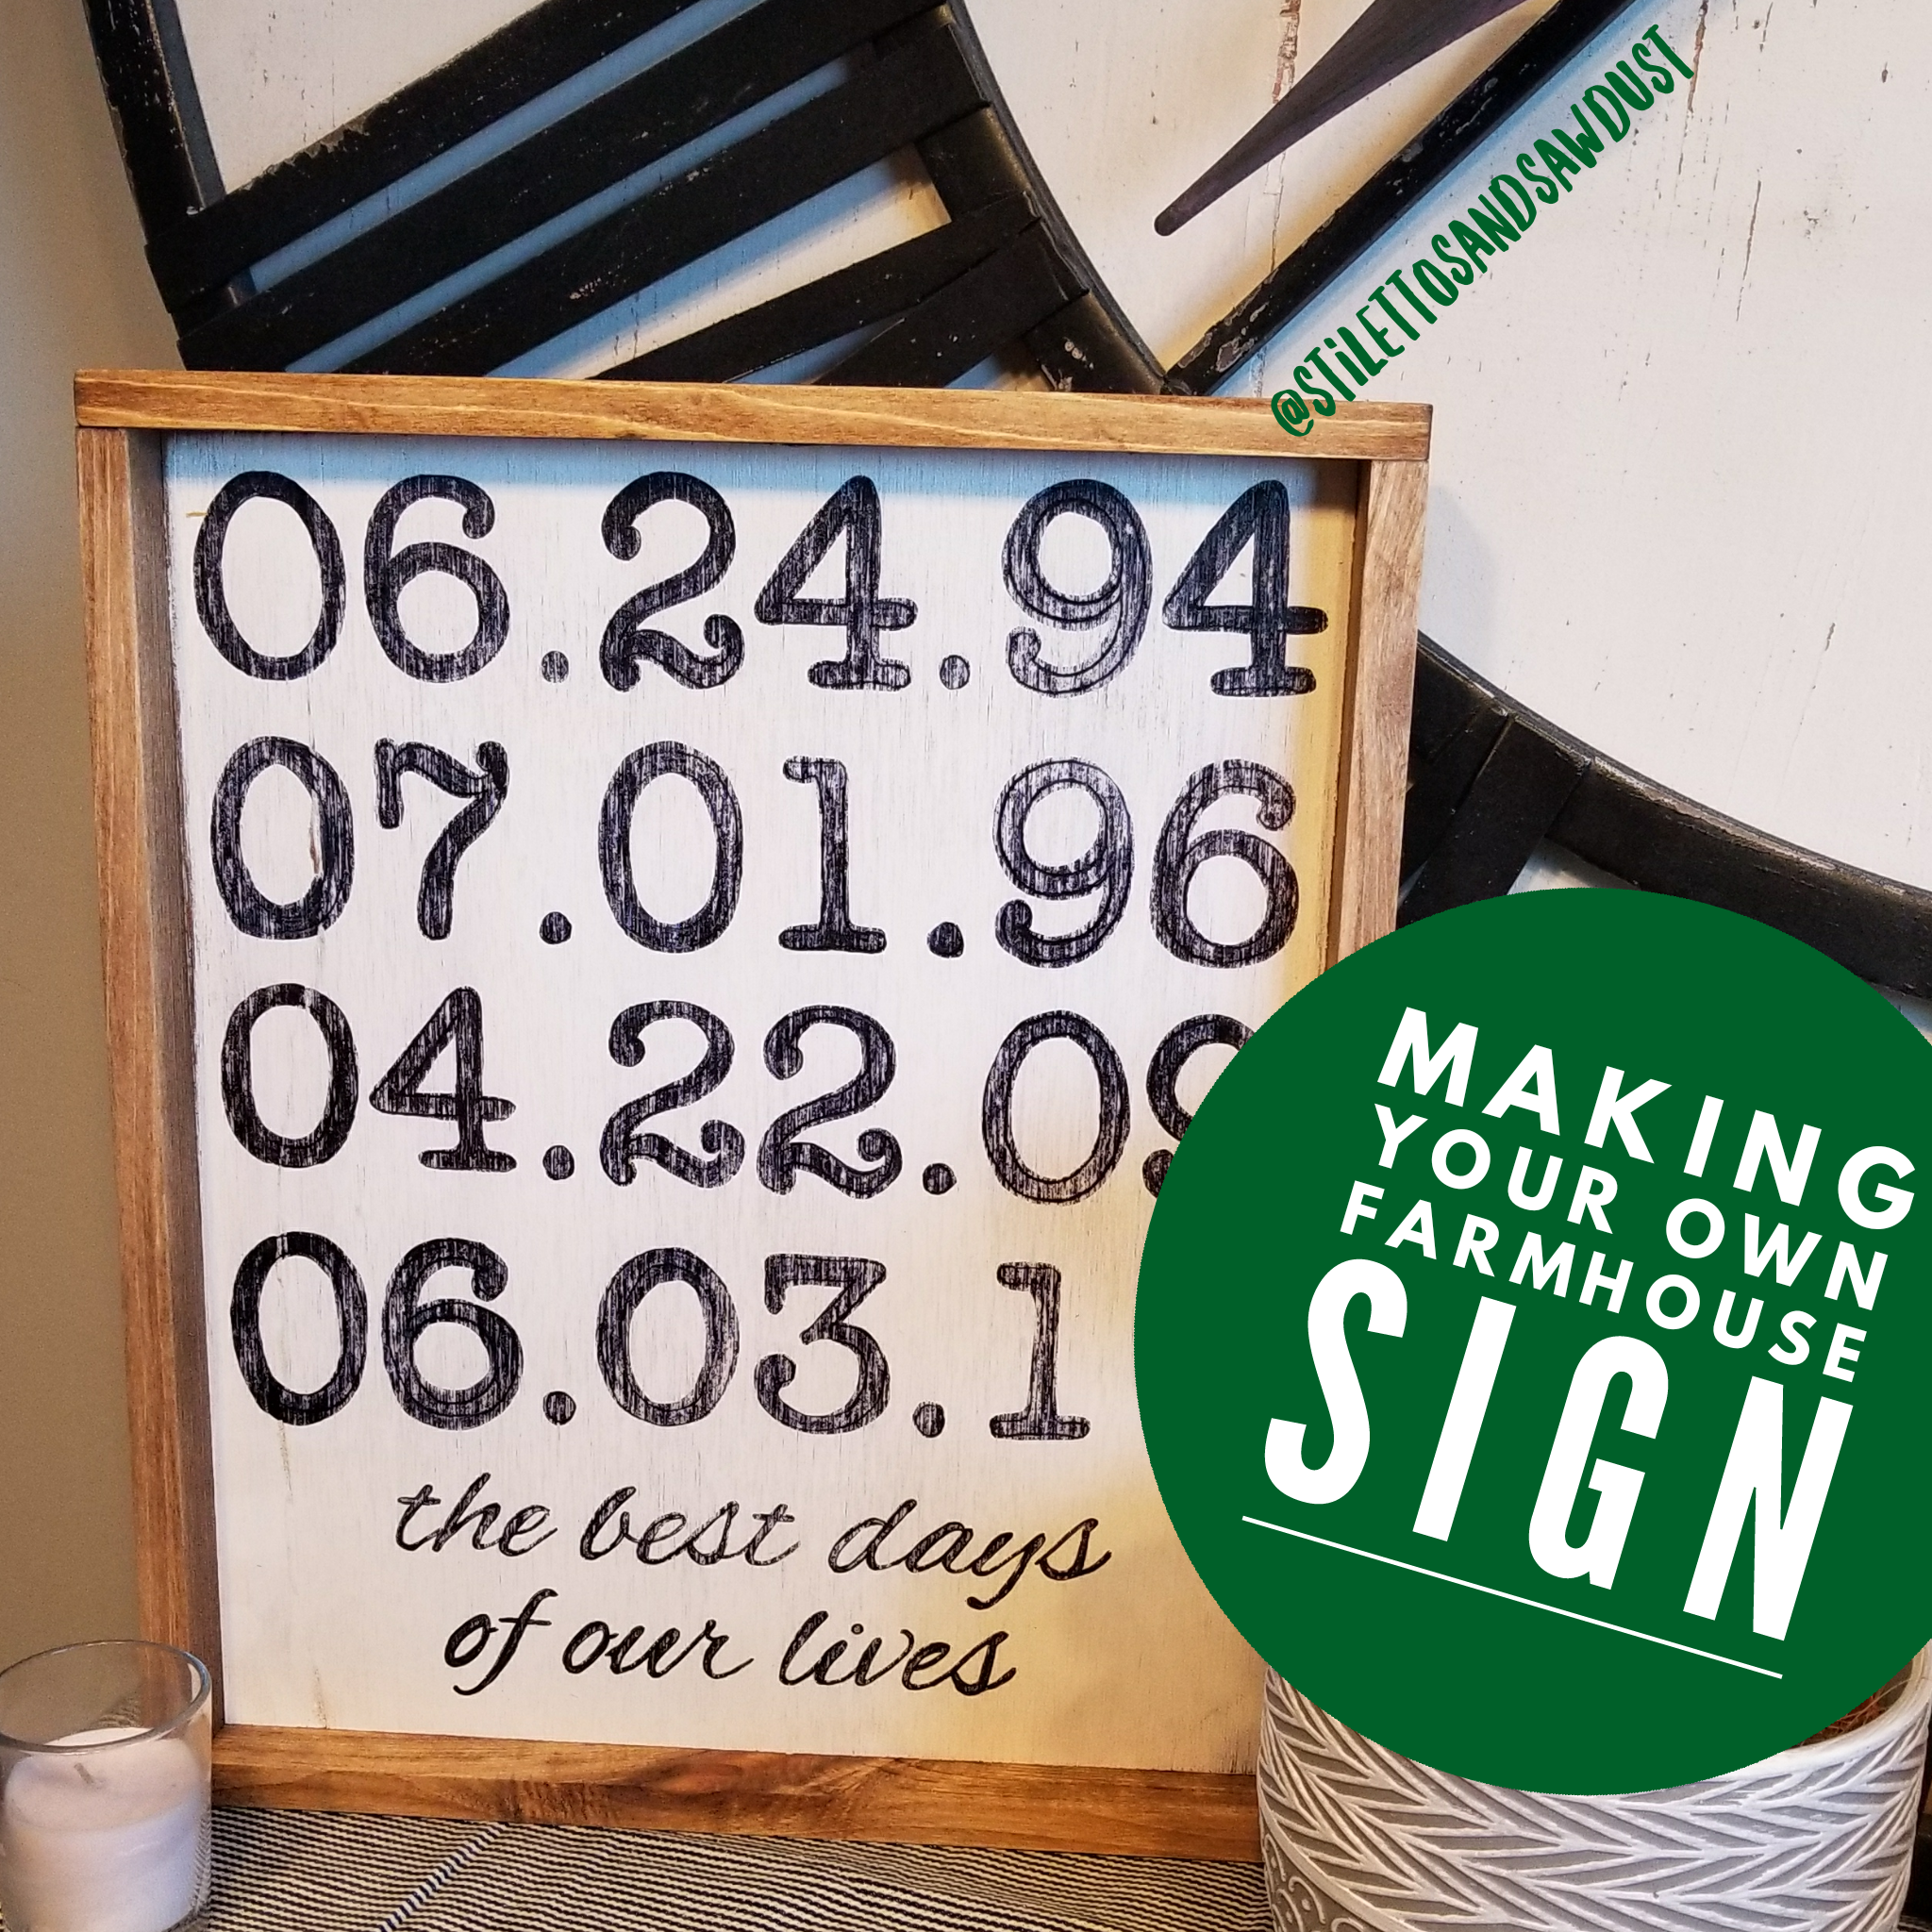
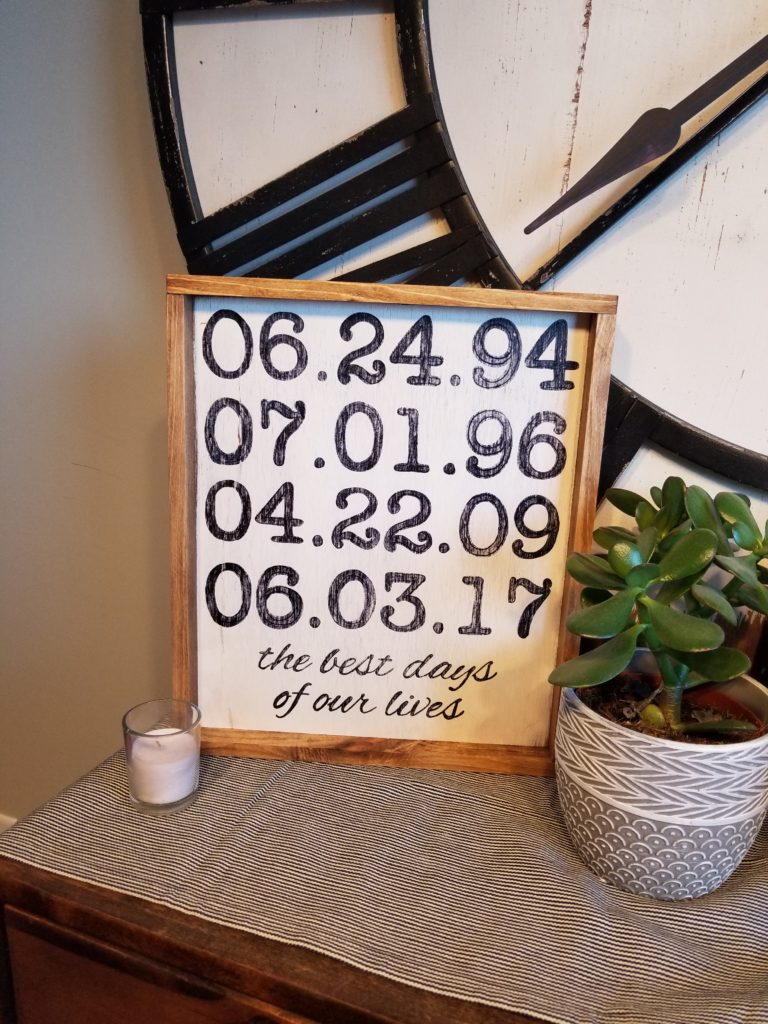
I love farmhouse signs. I don’t have many walls in this house to hang signs on but I will in the River House so I am stocking up in preparation!
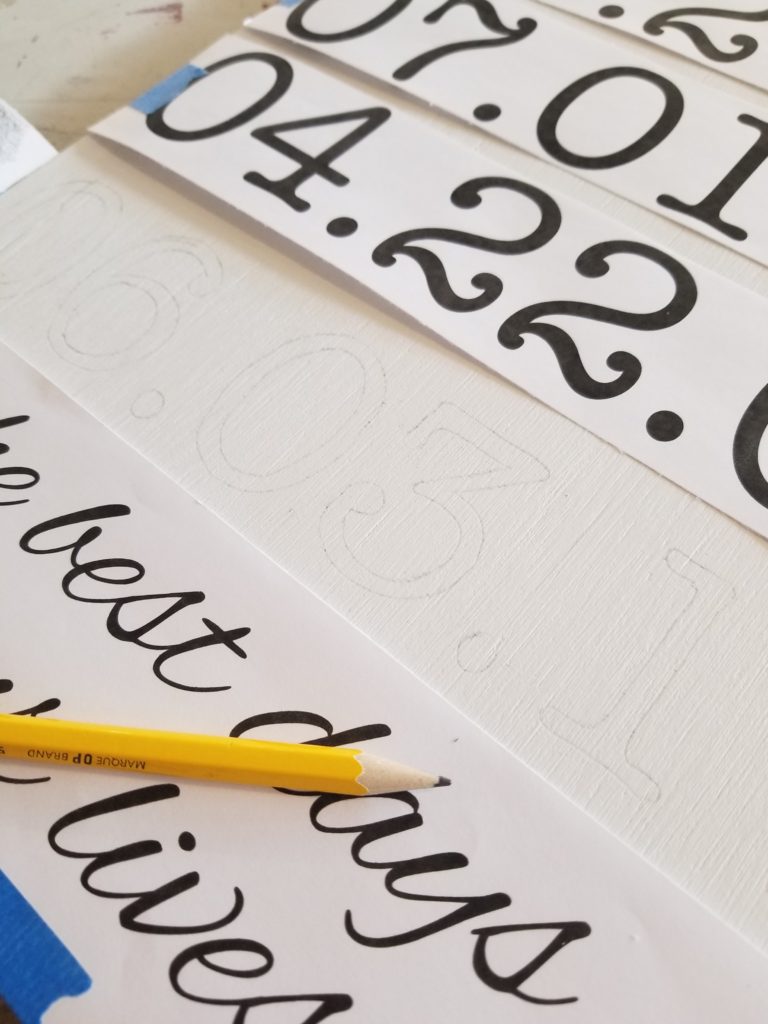
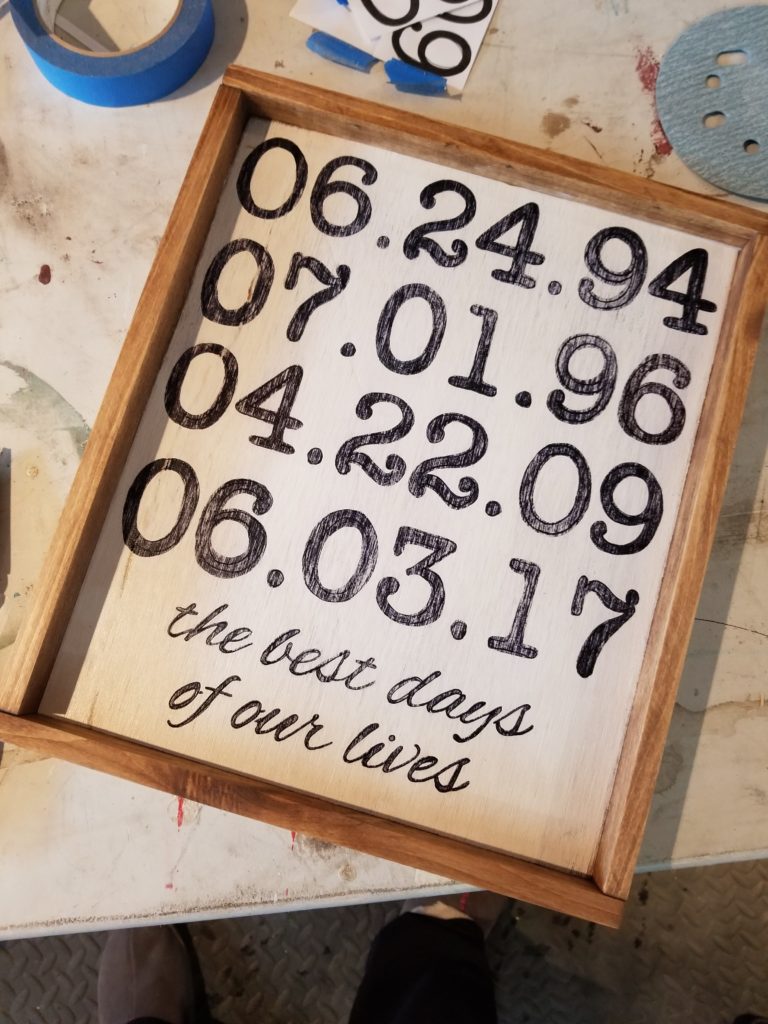
I have made dozens and dozens of signs over the last few years, usually for customers, but I have made quite a few for us as well and this sign that I made is one of my favourites. It just has so much meaning behind it. I had seen an idea similar on Pinterest a few years back and loved it so pinned it, but of course, had to wait until we actually had a wedding date to add to the sign!
There are a few different methods that I use to make these signs, and I will do a tutorial on each of them as I do new ones. This method is one of the easiest methods and requires the least specialty equipment.
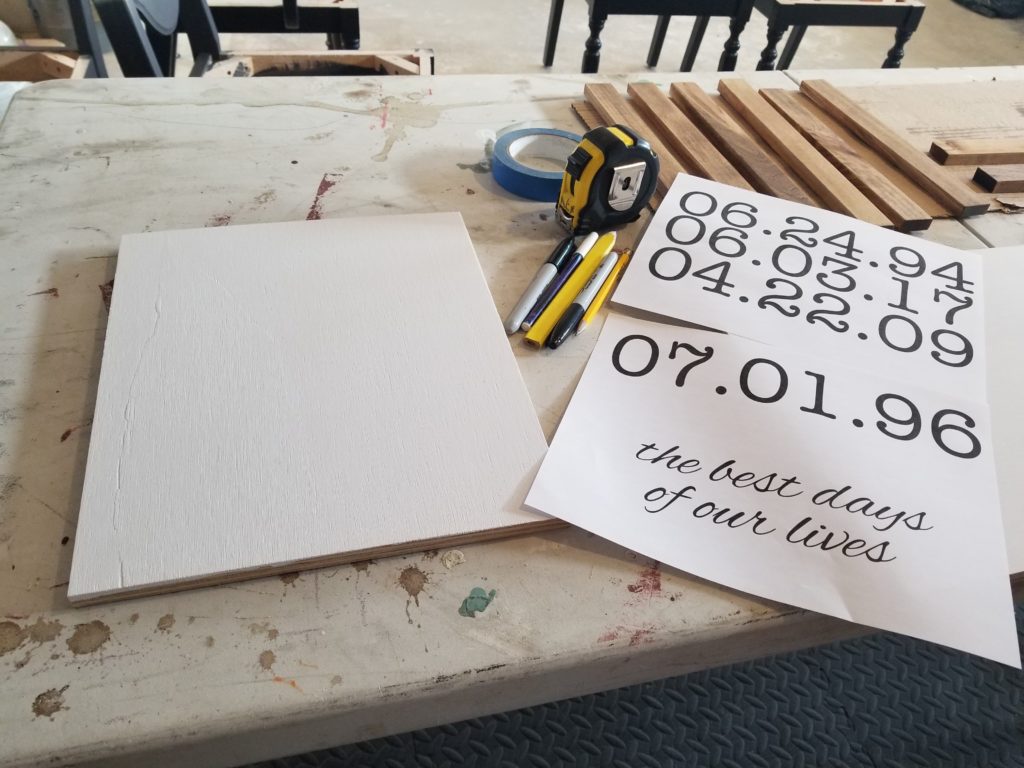
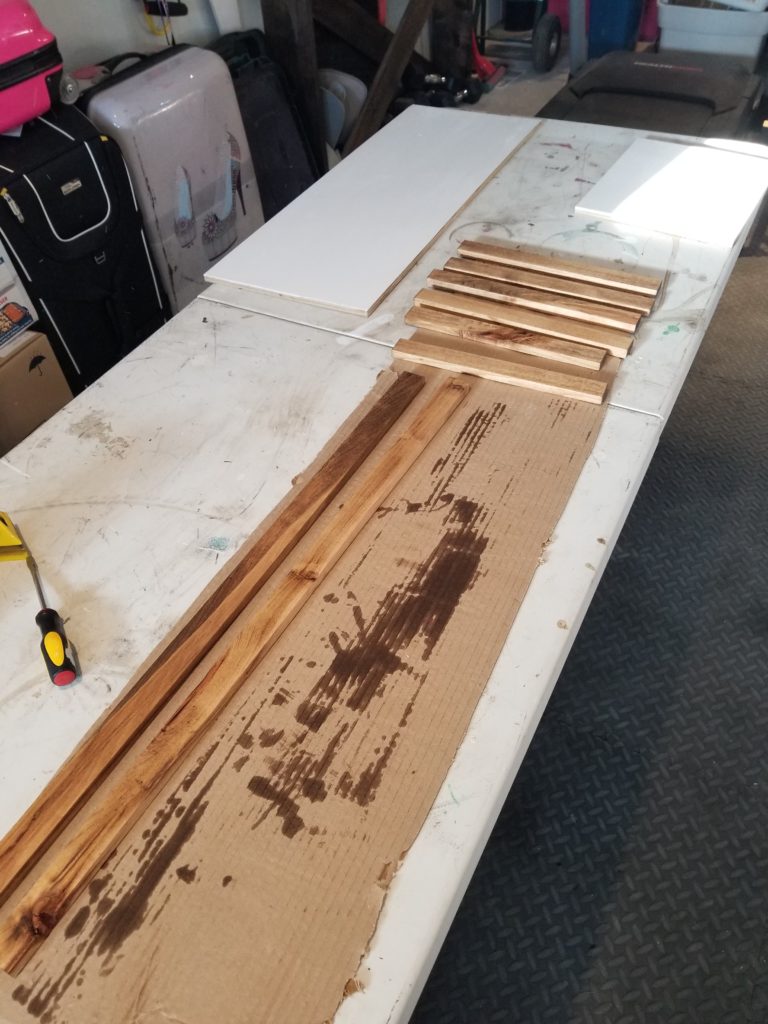
We always save the scrap pieces of plywood and MDF at the shop for any signs I might want to make so they would have ended up on the burn pile if I hadn’t “rescued” them! If you have friends who woodwork, it’s possible they would have some pieces lying around that they might let you have, otherwise you’ll have to purchase an entire sheet of plywood from your local building supply store and cut it to whatever size you are looking for. Most building supply stores will cut a piece of plywood down for you, but most of them are just rough cut so they don’t end up square. I have also made lots of signs with pieces of a board that were leftover from some other project. They look just as nice, but obviously, end up being narrow signs.
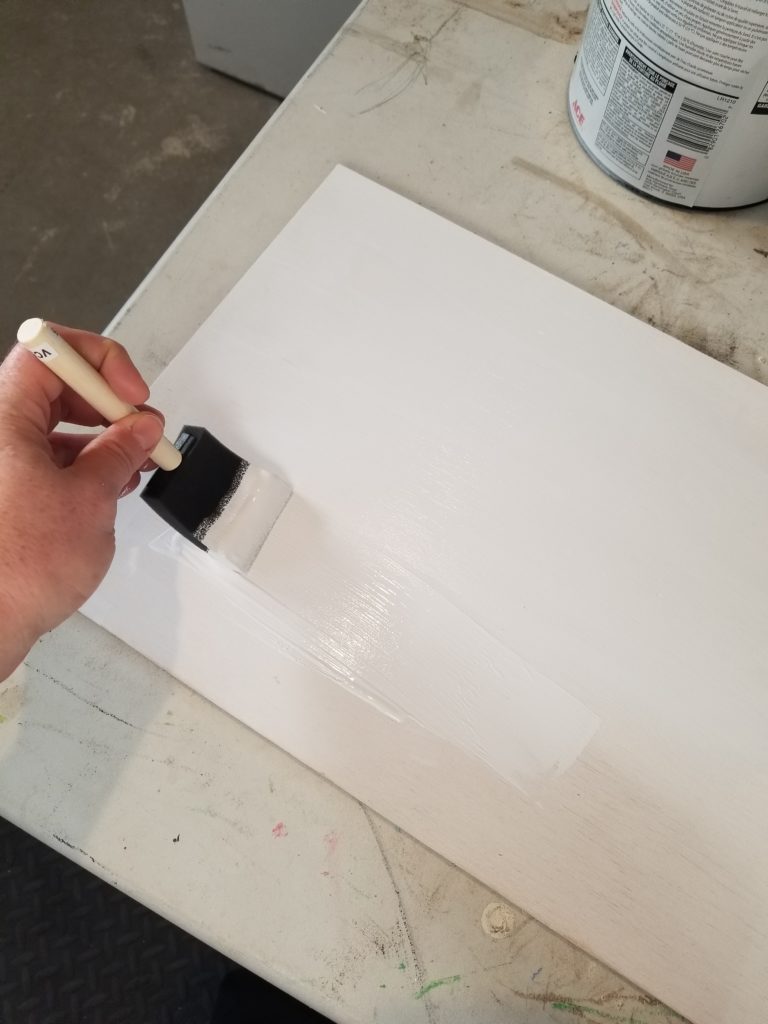
After you have found yourself the perfect piece of wood, give it a sand and make sure it’s smooth before applying a base coat of whatever color you want your sign to be, in this case white. I painted it twice, giving it a quick sand with some 600 grit sandpaper between coats. Let dry thoroughly.
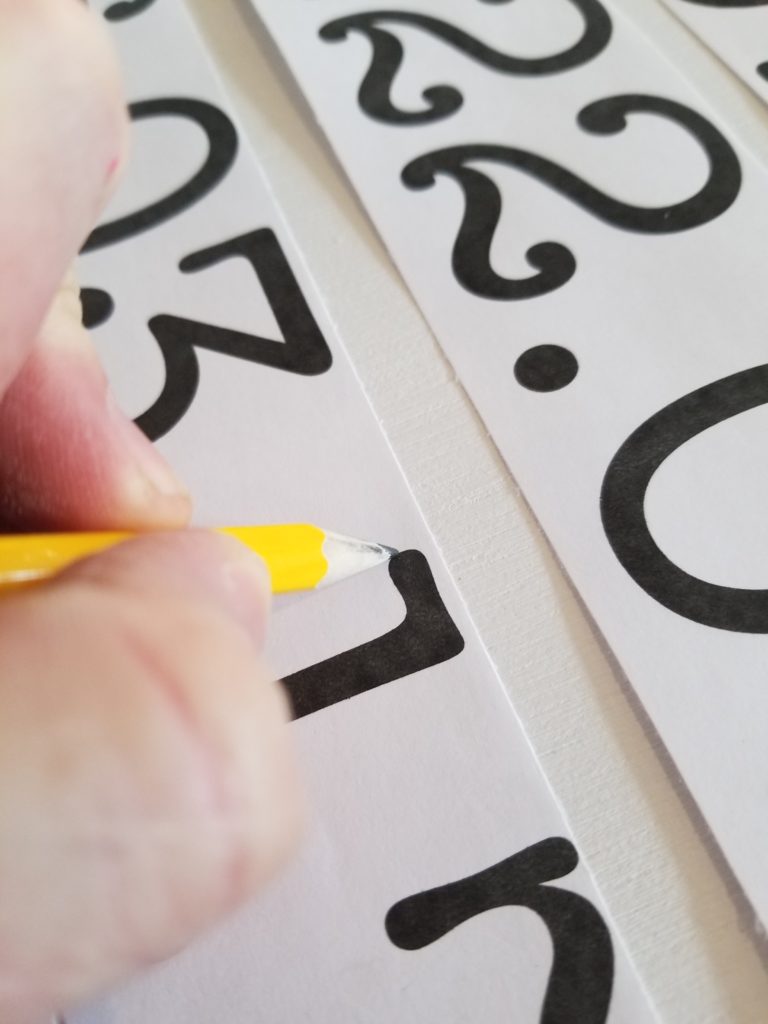
If you’re any good at Microsoft Word you can get the text and numbers the way you want them (the font and size you want) and print them out. Microsoft Word and I are currently not speaking to each so I used the Silhouette Studio (I have the Silhouette cutter but I don’t think you need to have it in order to use the software?!?). I find the Silhouette software really user friendly, you can set the workspace to the size of your project which makes it really easy to lay everything out how you would like it.
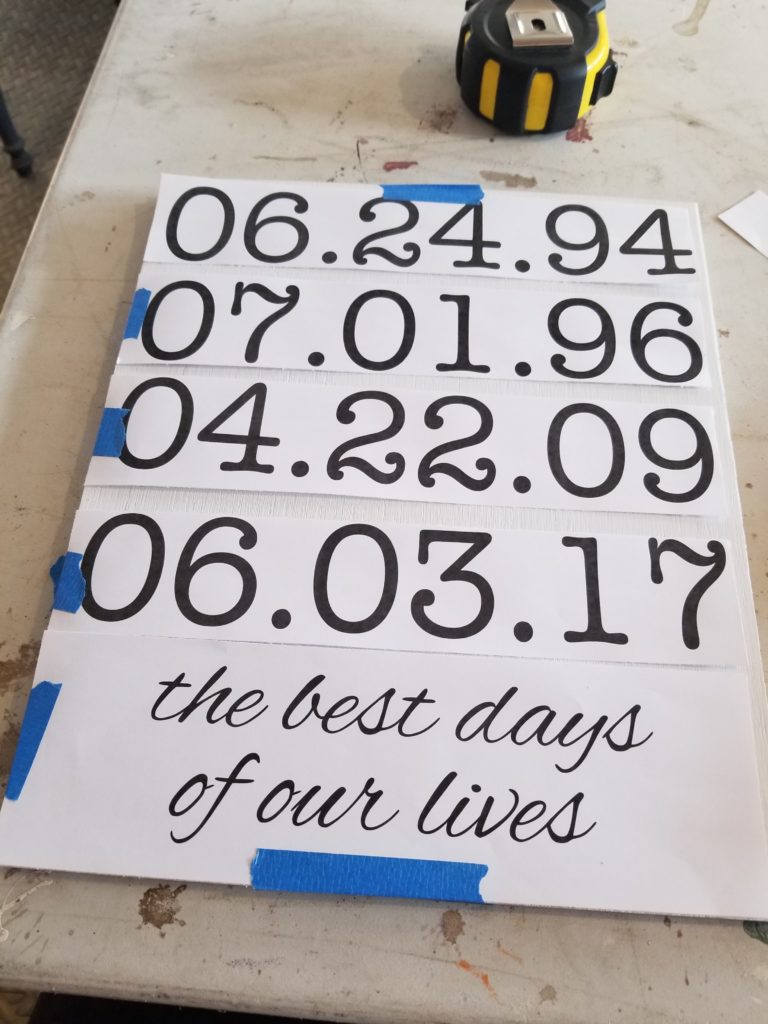
Once you have your text how you would like it, just print it out, it doesn’t have to be good quality, I usually set it to Draft to save on a little bit of ink! I find it easiest to cut all of the lines into individuals lines so I can space them out as I need to. Then I use little pieces of painters tape or masking tape to tack the paper to the wood until I am happy with the results.
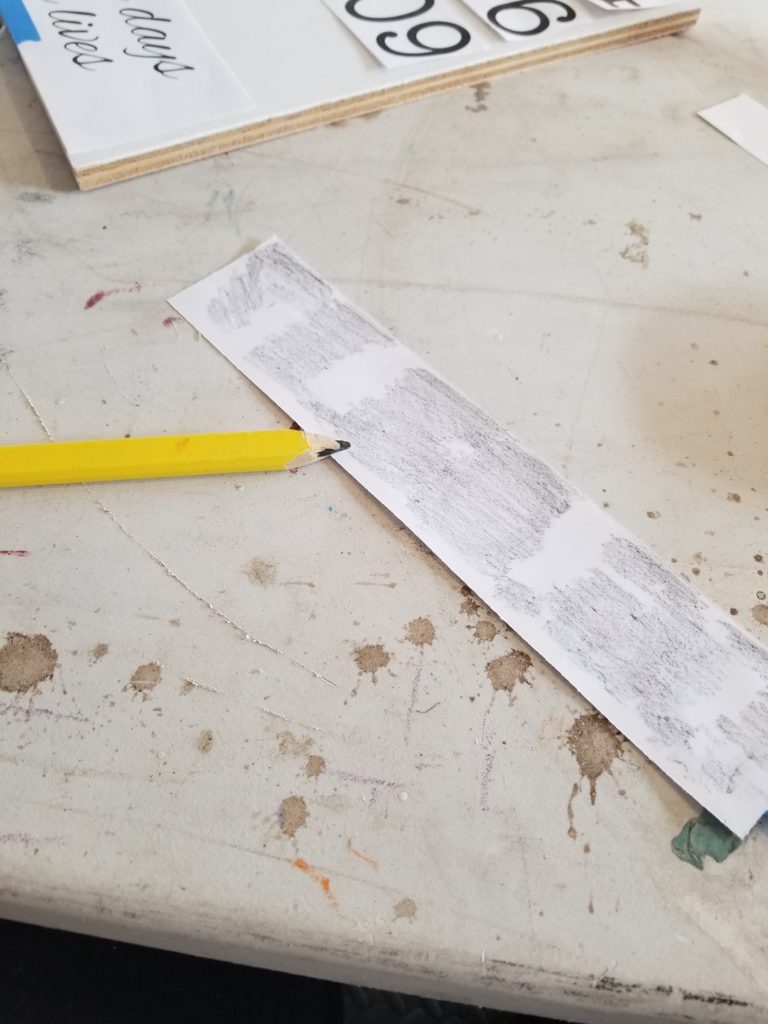
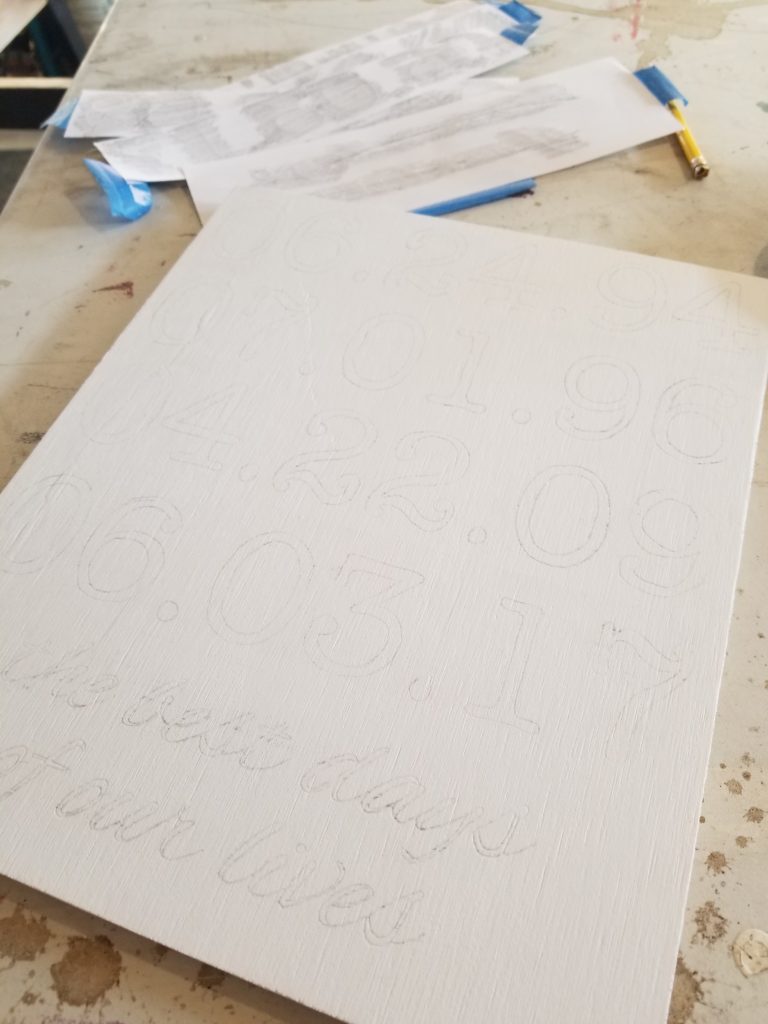
Once I have them all where I want them I take one off at a time and, taking a regular pencil, scribble all of the backside of the paper. It’s pretty easy to see where the letters are on the backside, so just make sure you cover all of the letters.
I would just like to point out that this is my work table not my good table!
Place the paper back onto your wood where you want it to be and simply trace around each letter/number, making sure the paper doesn’t move (or you end up with crazy letters!).
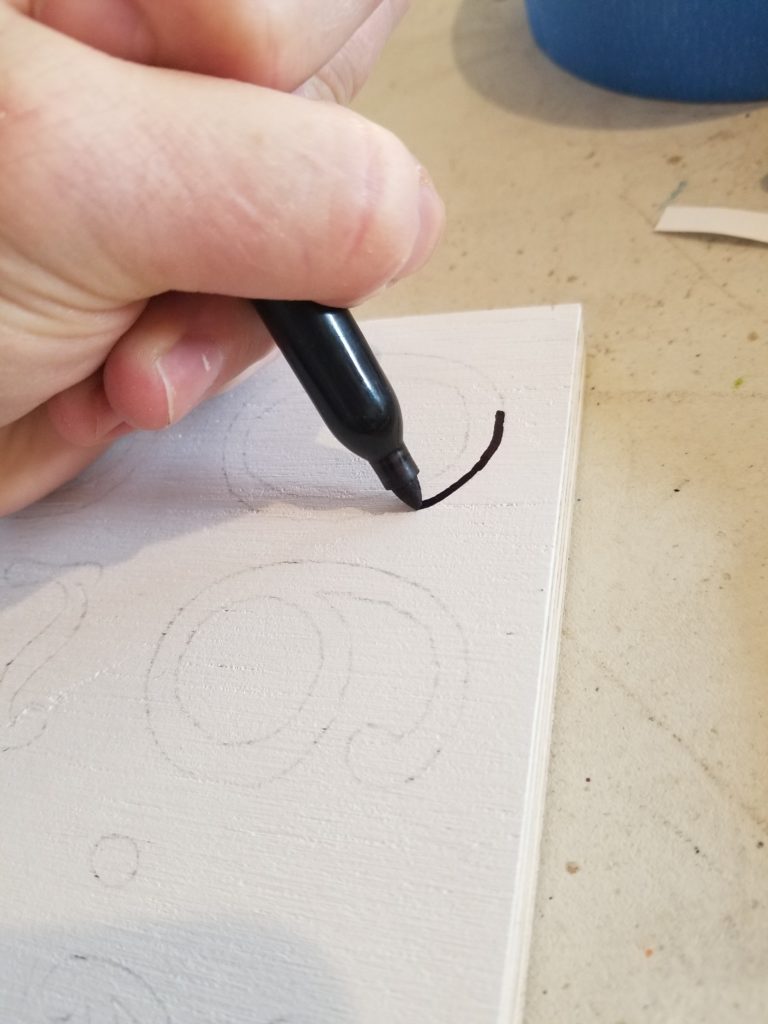
See how the pencil transfers onto the wood where you traced around? Cool, right?? Sometimes if it’s a darker piece of wood I will cover the backside of the paper with chalk instead of using the pencil, I find the chalk easier to see in that situation!
Repeat the above procedure until all of the letters/numbers have been transferred, then remove all of the papers, stand back and admire your work for a few minutes, then start outlining and filling in all of the letters/numbers with a Sharpie marker. Yep, you read that right. A regular old Sharpie marker. In the last few years Sharpie has come out with lots of new tips, and widths and thicknesses, even paint pens. The makers of Sharpie just get me. I must have at least a dozen different styles of Sharpie at any given time, and I have multiple of each style. I use them for EVERYTHING! I do find that I usually need a few pens for each sign I do. Something about writing on stain or paint really takes it out of the markers, thankfully they are cheap. I usually buy them on sale, and sometimes I get lucky and find a box of 12 really cheap. I have tried the paint pens Sharpie makes, and although I do like them, I prefer just the regular markers, unless you need white then the paint pens are the way to go!
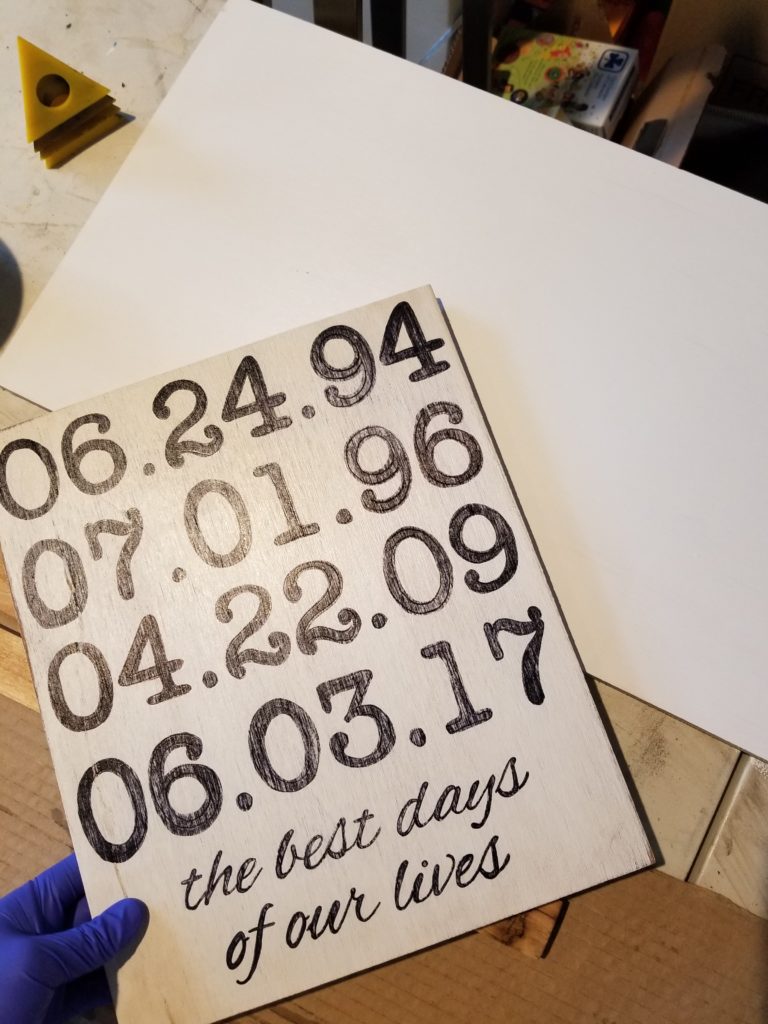
After you have filled in all of your letters/numbers you are just about there! If you’re happy with it the way it is you don’t have to do any extra work, however I wanted it to look older and faded so I ran my palm sander over it quickly to fade the letters out a little bit and scuff up some of the paint around the edges. Then, because I wanted it to look older, I quickly wiped some wood stain over the whole thing (I used Early American color by Minwax). It seems like a scary thing to do, putting stain overtop of your sign that you worked so hard on but most of it wipes off right away and it leaves behind a slightly aged creamier looking white paint.
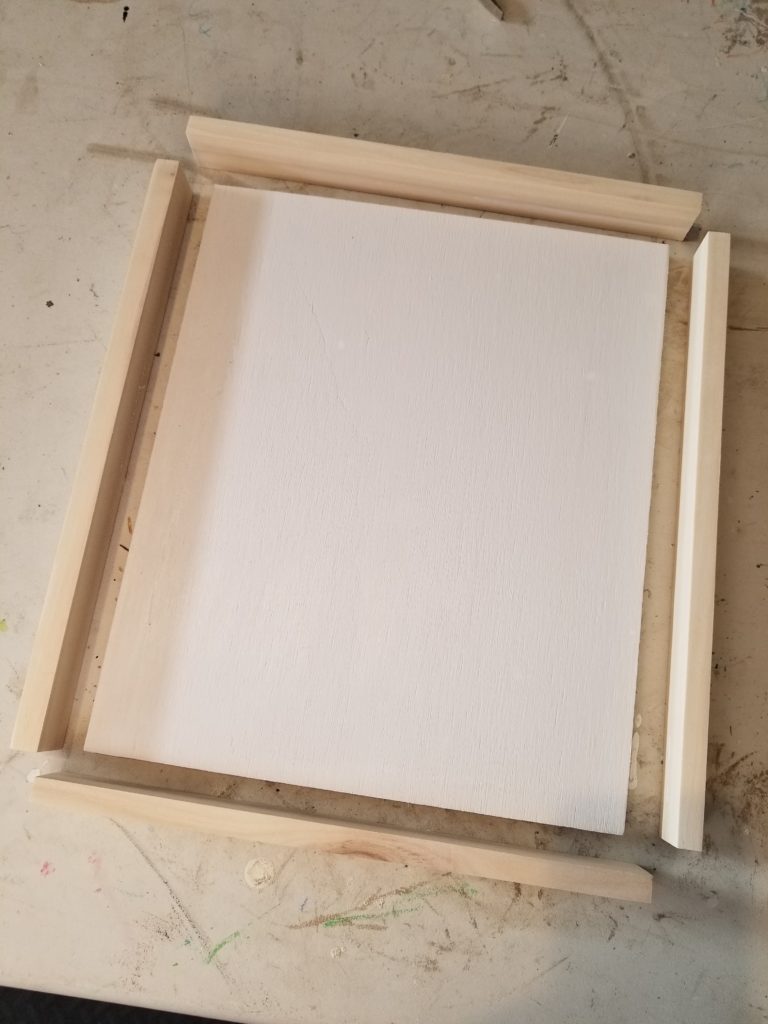
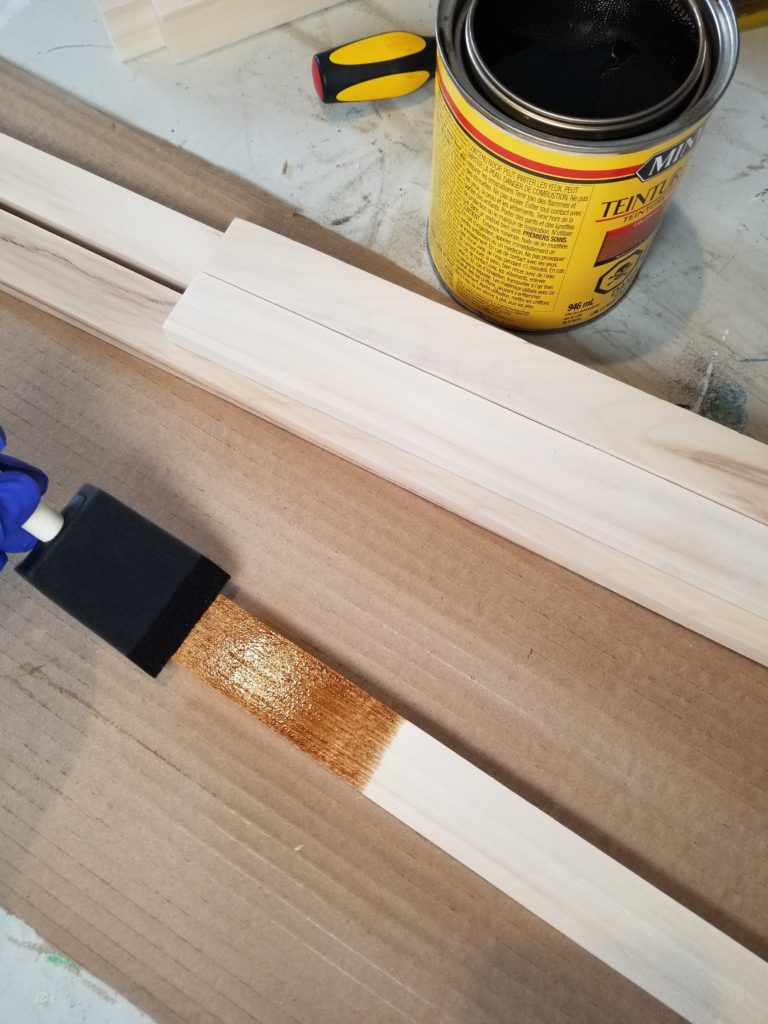
Lately I have been framing out my signs when I am done with them. I never used to do it, but I think it makes them look more finished and farmhouse-y. I use 1×2 lumber to make my frames and I cut each side after I have measured it against the sign. Once I have the 1x2s cut, I give them a sand, then stain them (again I used Early American Minwax). If you’re never used wood stain before it’s the easiest thing! You just use a cheap foam brush to brush it over the whole thing, then take a rag (old cut up t-shirts are my favorite as they are lint free!) and wipe it all off! Easy and fast! Normal people wait for the stain to dry, but I am the worlds more impatient individual so I attached them to my sign while they were still a bit wet. I attached the 1x2s with a finishing nailer, but if you don’t have access to one you could just glue them on, you just have to make sure to hold it all together with something (a paint can or two on each side works well!) and let it dry thoroughly!
I’m prepping for more than just this one sign!
When I made this sign I had planned to hang it in the stairwell in the gallery wall. Well, I say gallery wall, but at the moment it just looks like someone hung one or two random things and forgot to add anything else. There used to be quite a few things hung up there but I keep stealing stuff from it to put somewhere else in the house and never replace it. I’m torn between spending some time to make it look nice again, or just not bother as we’re moving soon! Anyway, somewhere I got lost…..right……I had planned to hang it in the stairwell but when I brought it upstairs and staged it against my giant clock I kinda fell in love with the little area so there it stays!
I have plans for some other signs and a few pieces of scrap wood just itching to get some love so I will do a different method on all of them and put up tutorials for them too. If anything isn’t clear and you want some clarification please don’t hesitate to let me know! I had planned on writing this today while Maddie was at school but the day got away from me so now I’m trying to get it done while her and Rex are watching a movie and it’s a bit distracting!
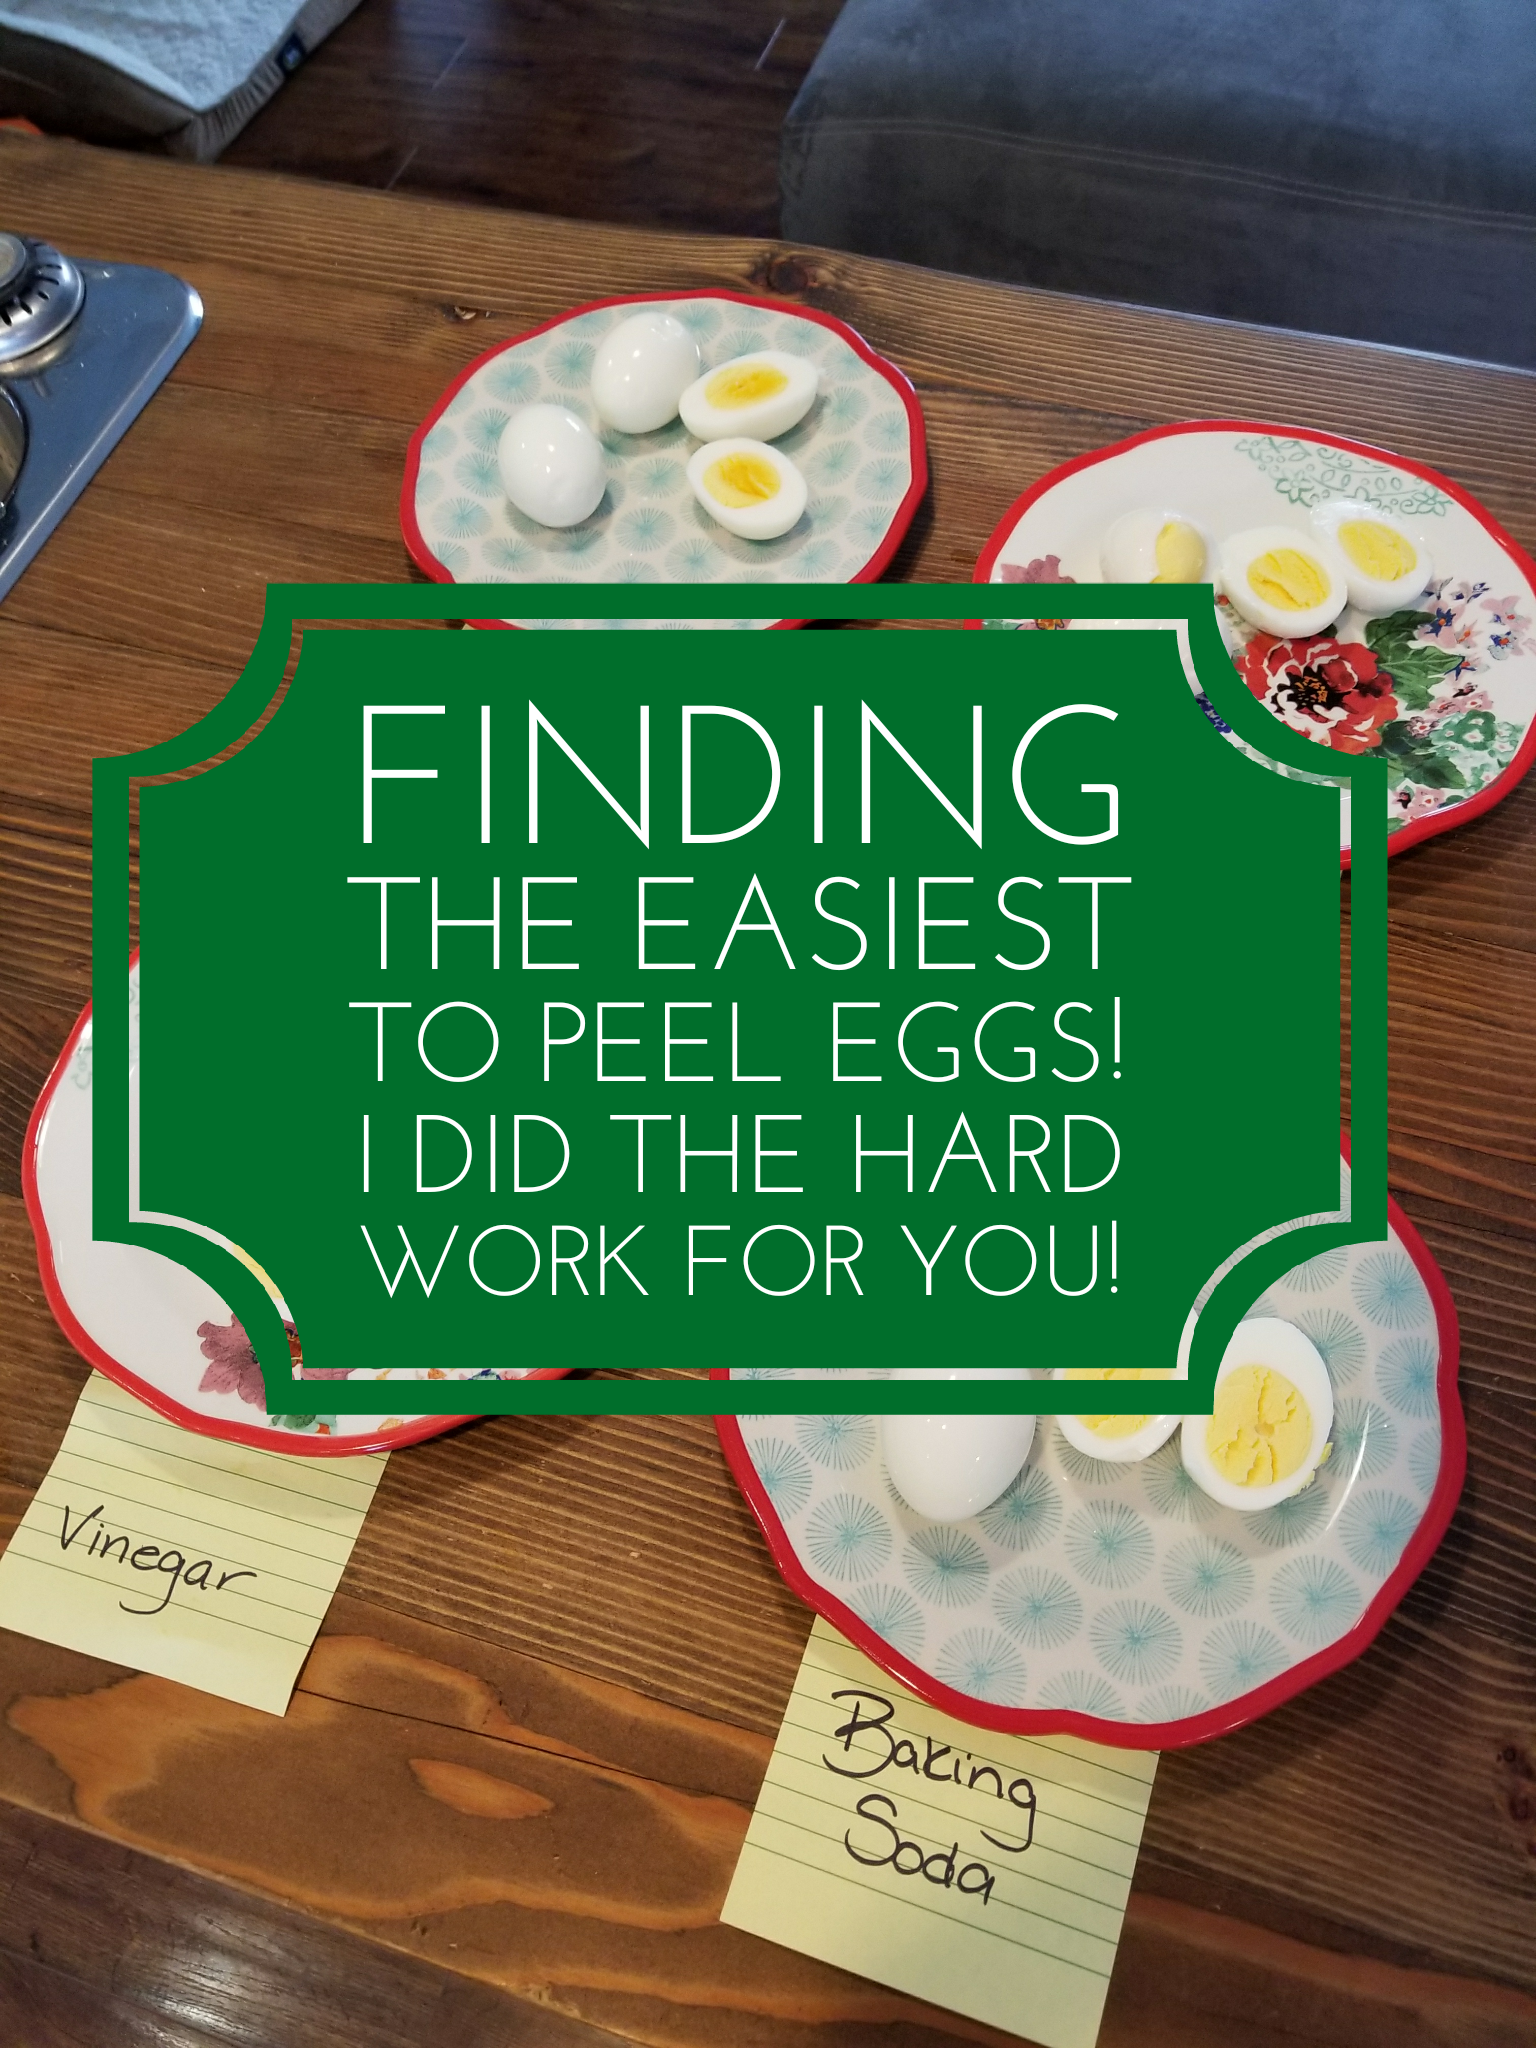
As part of my “get more organized in 2018” kick, I have been trying to do more food prep. We end up wasting quite a bit of food because it gets lost in the far reaches of the fridge where no one dares to venture. We also end up grabbing foods that are bad for us when we’re starving because healthy food is less convenient.
So I am trying really hard to have easily accessible, delicious, healthy foods available for any member of our family to just reach into the fridge and grab. And nothing is easier to grab than boiled eggs. All three of us love them, they are great for breakfast, lunch, or snacks, so it makes sense that we always have some in the fridge ready to be eaten. But eggs, despite being one of our favorite foods, have this seriously inconvenient little package they come in.
There is nothing more frustrating that trying to peel a boiled egg when the shell simply doesn’t want to come off. I have tried several “no fail tricks” over the years and often thought about conducting an “egg”speriment (sorry, I REALLY couldn’t help myself!) to see which is the most effective. Then this morning at breakfast my mother in law asked me if I had any tricks to making eggs easier to peel and I thought to myself “Self! (Cause that’s what I call myself!) You should spend some time today trying all of the popular tips and tricks!”
And I just happened to have a dozen eggs in the fridge waiting to be boiled! How convenient!
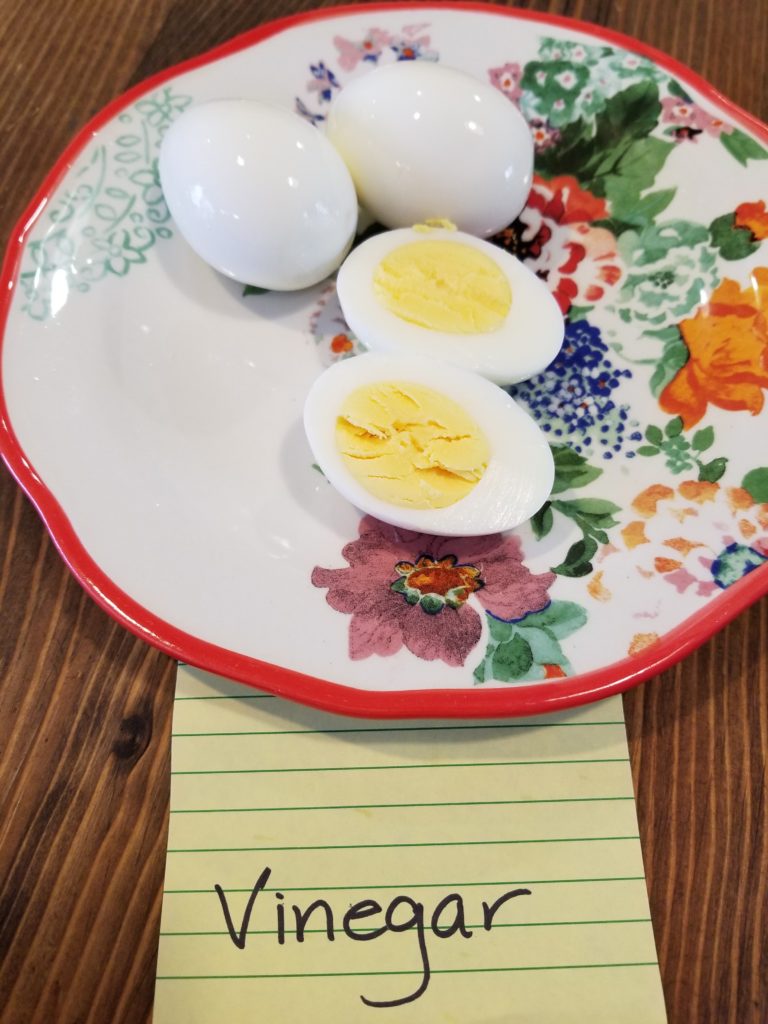
I will elaborate on all 4 of the methods I tried today, but to make things easy I have called them “Vinegar”, “Baking Soda”, “Cold Start”, and “Pioneer Woman”.
Vinegar method
This is one that my mother in law and few of my friends use on a consistent basis. Simply add white vinegar to the water. Sounds simple enough, and who doesn’t have vinegar at home?
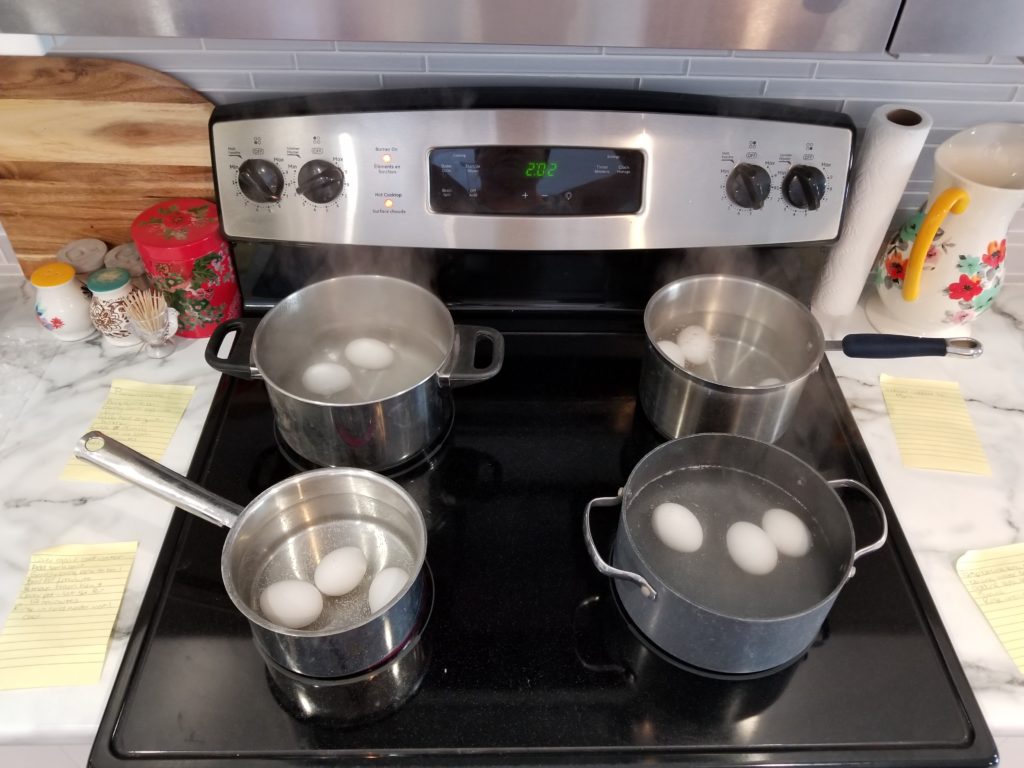
To help make this slightly more scientific I measured out 2 tsp of vinegar into my pot of water (see if I was a real scientist, I would have measured how much water I used as well!) and set the water to boil.
After the water was boiling I gently added my 3 eggs and let simmer for 15 minutes.
Once the time was up I ran them under cold water for 5 minutes before peeling.
How did they peel? Pretty well actually! There weren’t any spots where the shell stuck to the whites, I couldn’t get really big pieces of shell off but they did peel pretty nicely.
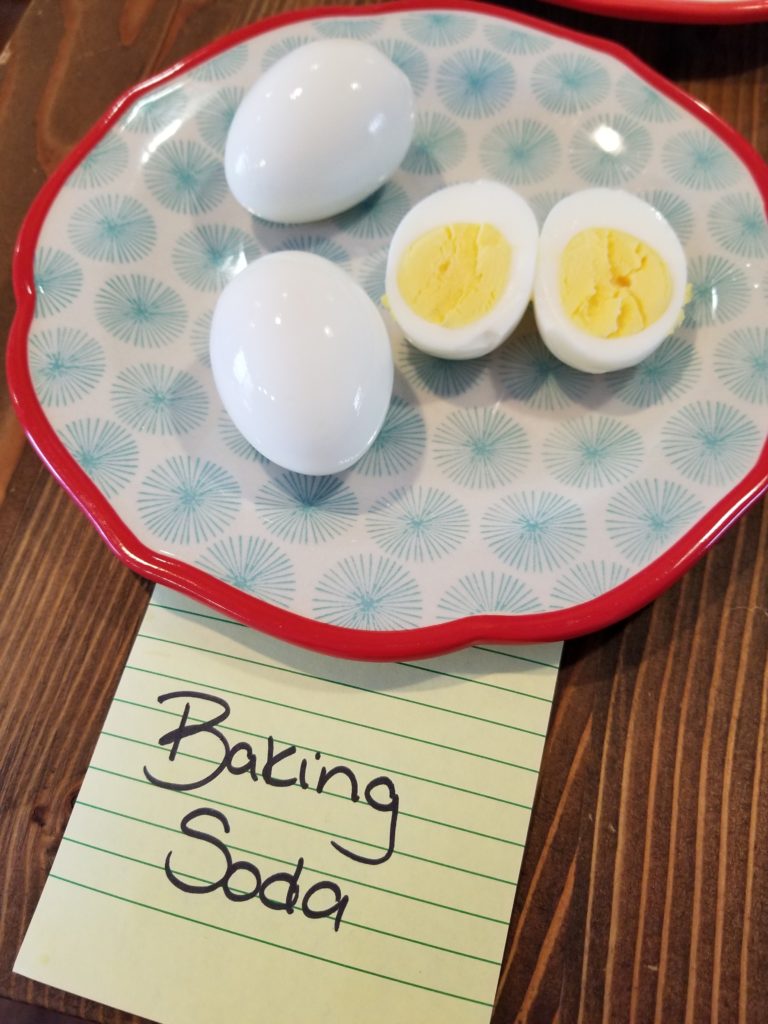
Baking Soda
This is the method I have been using for the last few years. I would like to say it never fails me, but if it never failed me, I wouldn’t have had to conduct this experiment (see, I didn’t subject you to my bad joke this time!).
I added 1 tsp of baking soda to my pot of water before I added the eggs. If you wait to add the baking soda until the water is already boiled it bubbles and fizzes and looks like a cauldron….but maybe it’s just me that enjoys that. I then gently added the 3 eggs into the boiling water and, again, let them simmer away for 15 minutes.
Once again, when the 15 minutes was up I ran them under cold water for 5 minutes before peeling.
How did they peel? They also peeled really well. The baking soda seems to help firm the whites up a bit (if you add too much baking soda though sometimes you end up with more rubbery whites…..voice of experience!). But as with the vinegar ones, the shells came off in smaller pieces than I would have liked.
Yep I’m getting picky now.
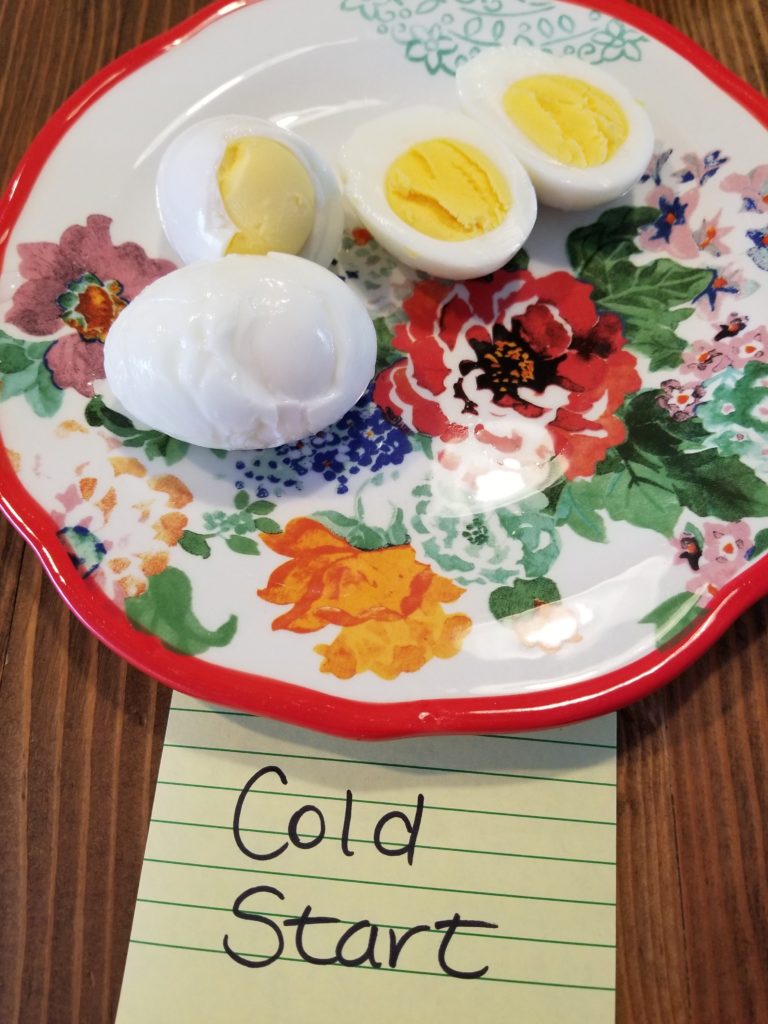
Cold Start
This was my first time making boiled eggs this way although I have read about this method several times. You start out by covering your eggs with cold water then placing them on the stove and gently bring the water to a boil.
Once the water is boiling, you let it bubble away for 1 minute, then put the lid on, remove from heat, and set the timer for 12 minutes.
After the 12 minutes are up, rinse them in cold water for 5 minutes, then peel.
How did they peel? This was the last batch I peeled and I was beginning to think maybe I just had perfect eggs to start with. Luckily the cold start method set me straight. This was my first and my last time cooking eggs by this method. The shells stuck to the whites and I lost huge chunks of delicious eggs. One egg I even lost the entire bottom of! They were a mess!
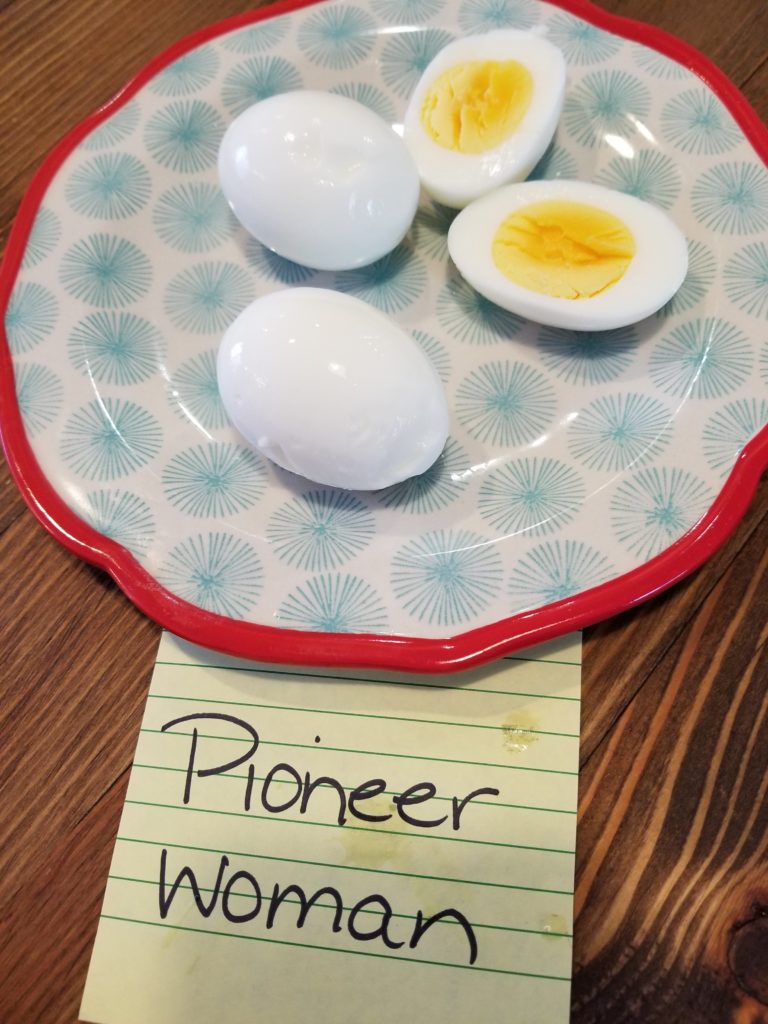
Pioneer Woman
Now this method is called Pioneer Woman because it’s on her website as “Easy-to-Peel Eggs” so I thought “Dang, I should just do it this way from now on. This is the way Ree does it, it must be the right way!” (After all, that woman is a goddess in the kitchen!)
Her method is to bring the water to a boil before gently lowering the eggs in, then lower the heat to a gentle simmer for 13 minutes.
After the 13 minutes are up you quickly remove the eggs from the boiling water and drop them into an ice bath for 5 minutes before peeling.
How did they peel? I’m really torn about how to answer this question. Honestly, these were the easiest eggs to peel, the peels pretty much just slipped off and it came off in big chunks. That being said, there were a few small spots on each egg where the peel stuck and took a very small amount of the white off.
I think the reason they peeled so easily, honestly, is the ice bath. I ran out of eggs so I was done for the day but there are thoughts in the back of my head that I haven’t yet stumbled upon the perfect cooking method. I think the winner is going to be either the baking soda or vinegar with an ice bath after they are done cooking.
I will have to come back and update this post once I finish tallying my findings. Thankfully I have a cousin who is a chicken farmer so I’m going to try with farm fresh eggs, because we all know those are the worst!!!!! I’m hoping to have my own egg layers when we move to the farm so I have to have this nailed down before that!
But one thing I did learn during this whole endeavour? Boiled eggs are delicious no matter how you cook them, or how difficult they are to peel! Mmm Mmm Good!
Do any of you have a tried and true method? I’d love to hear about it!
Every year I make New Years Resolutions and by the end of January I have usually given up on most of them. There are a few that I have held onto over the years though so there’s hope that I’ll stick to some of this years resolutions!
Usually when I make a list of things I would like to do differently they are pretty generalized; lose weight, eat better, be more active, spend more time with Maddie doing something other than watching TV, etc. This year I have decided to take a different approach.
I am setting specific goals for myself for each month. Each month will compound so by the end of the year I will have altered 12 areas of my life. At the beginning of each month I will post my intentions for the rest of the month and check in with how the previous month(s) have been going for me.
For the month of January I am going to focus on this blog and build my following. I have neglected this blog and only posted when I had some spare time, but then it occurred to me that I should schedule it in like a job. I should make time in my week to work on this. This blog, and you readers, are something I am passionate about and something I enjoy. Why don’t I do it more often? So my commitment to you is that I will post a minimum of one post per week. There will be weeks, like this one, when I post more than once, but that will be my minimum. I am certain some will be short, some will be just a personal rant, but some will be long and detailed and useful. If there is ever something you would like me to write about, a project you would like me to tackle, please don’t hesitate to let me know! I am happy to have suggestions.
When I started this blog is was going to be a DIY based blog but there have been very few of those so far, so this is now a lifestyle blog. I had never considered myself to be much of a cook, I mean, I always managed to whip up some supper that fit all of the food groups. It always tasted pretty good, but recently I have switched to a Paleo lifestyle and have started experimenting more in the kitchen and am really enjoying it. I have been posting on my instagram (@stilettosandsawdust) and on my Facebook page pictures of our meals and have been getting lots of comments and questions for recipes. So that is one thing I am also going to try for the month of January. I am going to try posting some of the meals that we have, and along with that, will post printable recipes for those wanting to try them.
As mentioned above, some posts will be shorter than others, this is a short one. But it needed to be put out there into the world to keep me accountable!
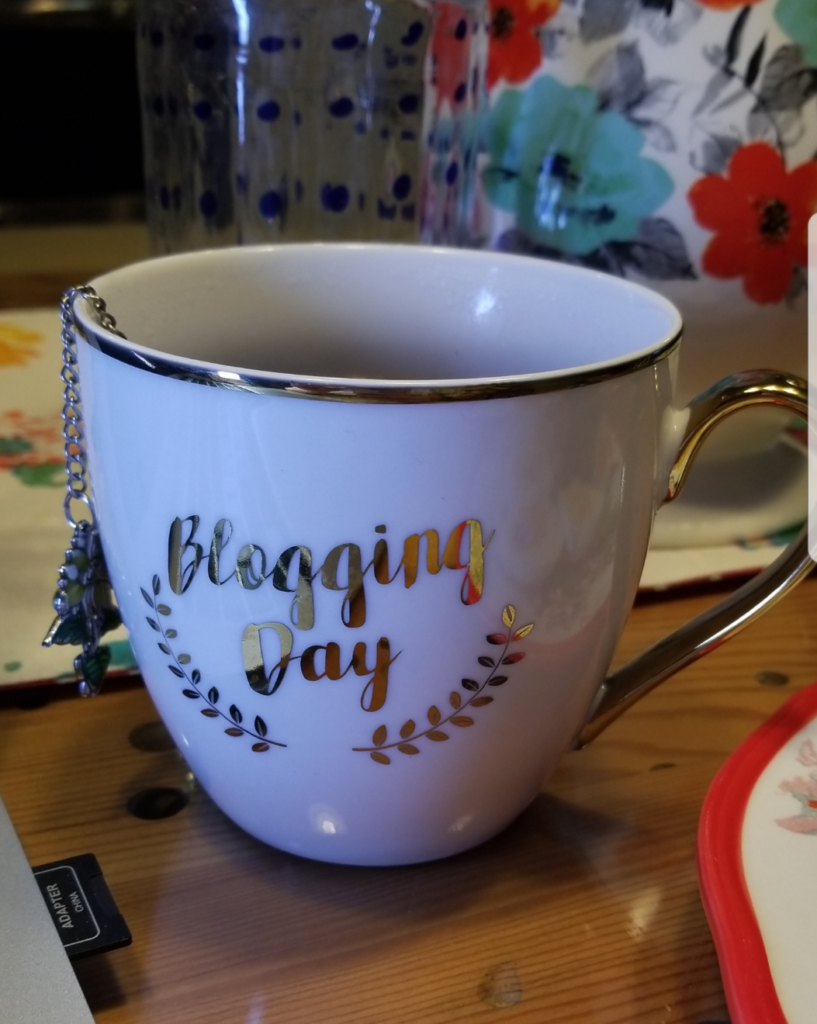
This is my first blog post of 2018. The first of, what I hope, will be many. One of my resolutions was to post more frequently on here and to build a bigger following. Yesterday I bought myself a new mug for my blogging days (which are now scheduled on my calendar), and we all know the power of a new mug!
The holiday season is over now, and it’s back to regular life. I got all of the Christmas decorations put away and sent to storage earlier in the week, Rex is back to work, and today is Maddie’s last day of Christmas break before school starts again on Monday, so she has some friends coming over this afternoon to celebrate and I am trying to get back into a regular house keeping schedule again. Thankfully I was lucky enough to get a Roomba for Christmas so my vacuuming is all taken care of!
Our house is for sale so I’m also trying to get things sent to storage so the house is less cluttered. I am just itching to get moved and get started on the renos at the new house. We’re going to try to do as much as we can with as little money as we can and I will be documenting the whole process so that will be exciting and will make for easy writing, I’m sure, as it’s what I’m passionate about the most!
Life should be very different for us in the new house. We will have lots of acreage and I am hoping to get enough animals to make us self sufficient. That’s my 10 year goal. To use our land to be as self sufficient as possible. I have these grand dreams of being a homesteader so we’ll see what the reality turns out like!
Fingers crossed everything goes according to plan (I should know better than that by now!) the next Christmas will be spent at the River House. I am so excited about moving, so excited about renovating, but mostly, I am so excited about the first Christmas spent there. With any luck there will be multiple trees, many 1000 lights, and many many memories made.
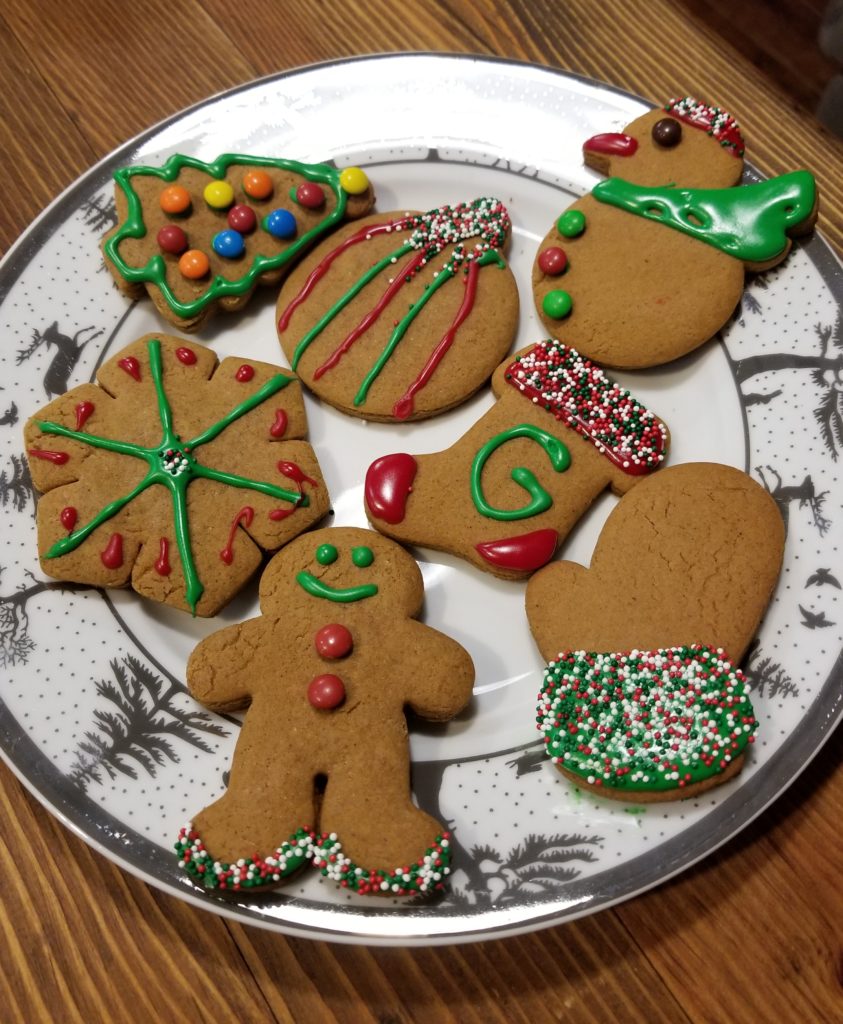
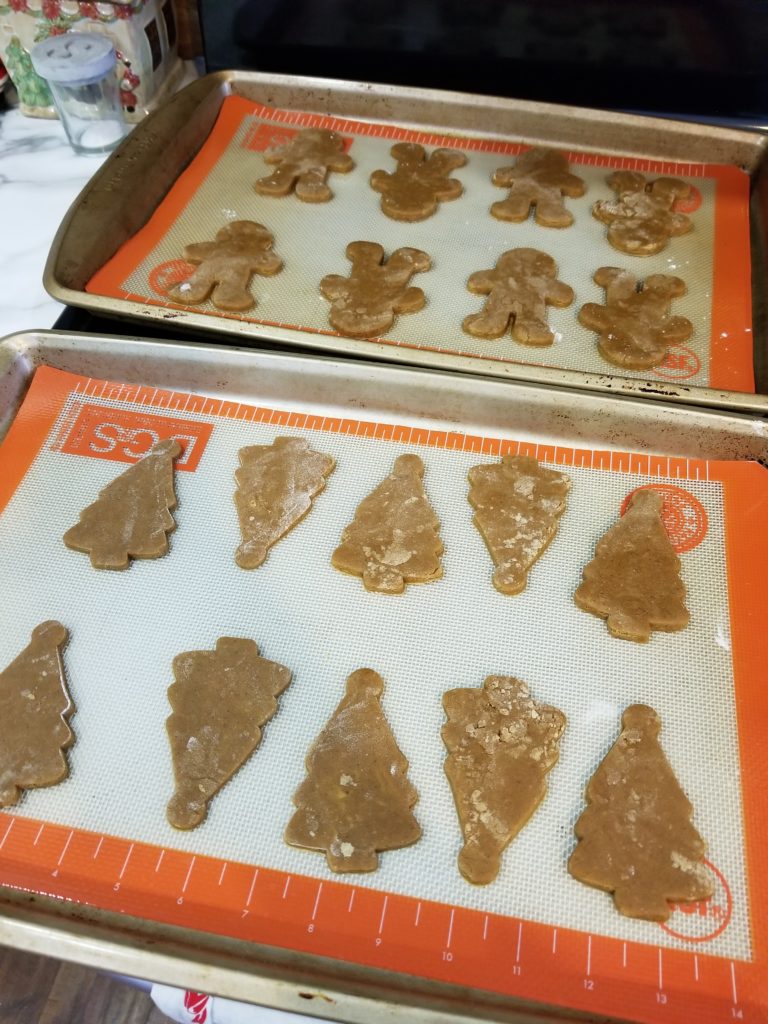
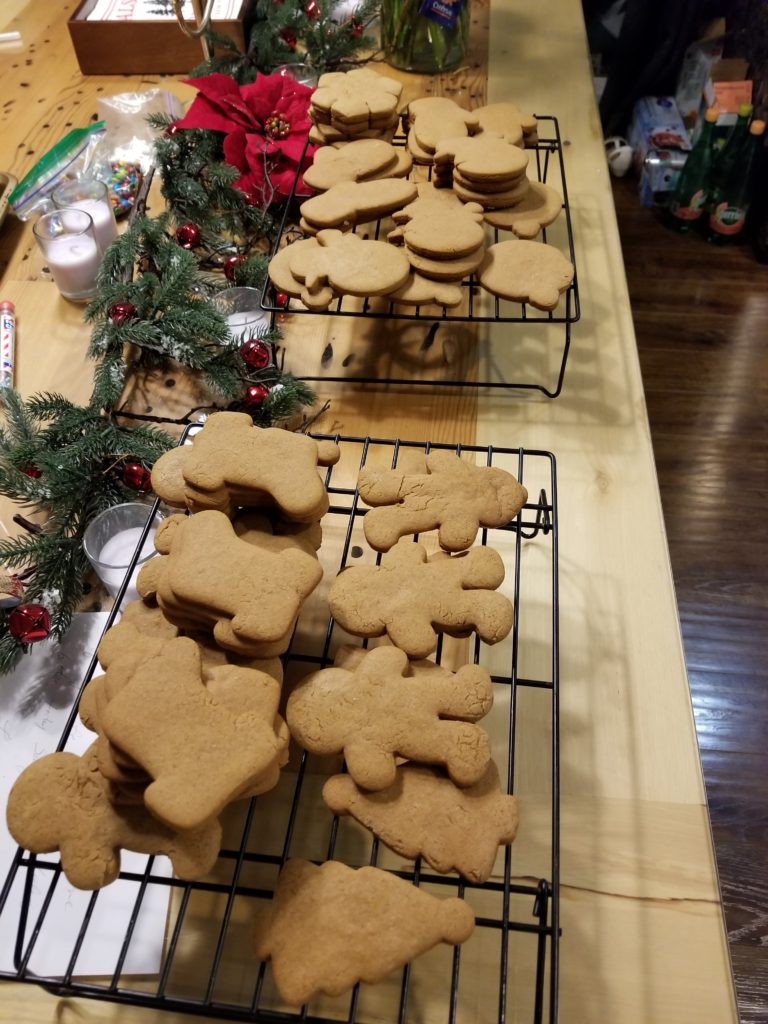
My obvious love of Christmas means that I love anything holiday related. And to me, nothing says Holidays like gingerbread. I love the smell of gingerbread, I love the way the spices dance on your tongue, I love that they are so fun to decorate and personalize. But I’ve never been a big fan of the hard brittle gingerbread cookies.
You know the ones.
The ones they make gingerbread houses out of. The ones that are so hard that being left out in the open air for 30 days doesn’t affect their texture at all. The ones that I’m sure are responsible for many fractured teeth at this time of year. They still have that same spicy sweet taste, but I just can’t stand a crunchy cookie. I like my cookies soft and chewy.
So when I stumbled across this recipe for soft chewy gingerbread cookies that held their shape I was instantly in love.
We decorated a plate of cookies for Maddie’s teacher Mr. Gray! Teachers love sugar!
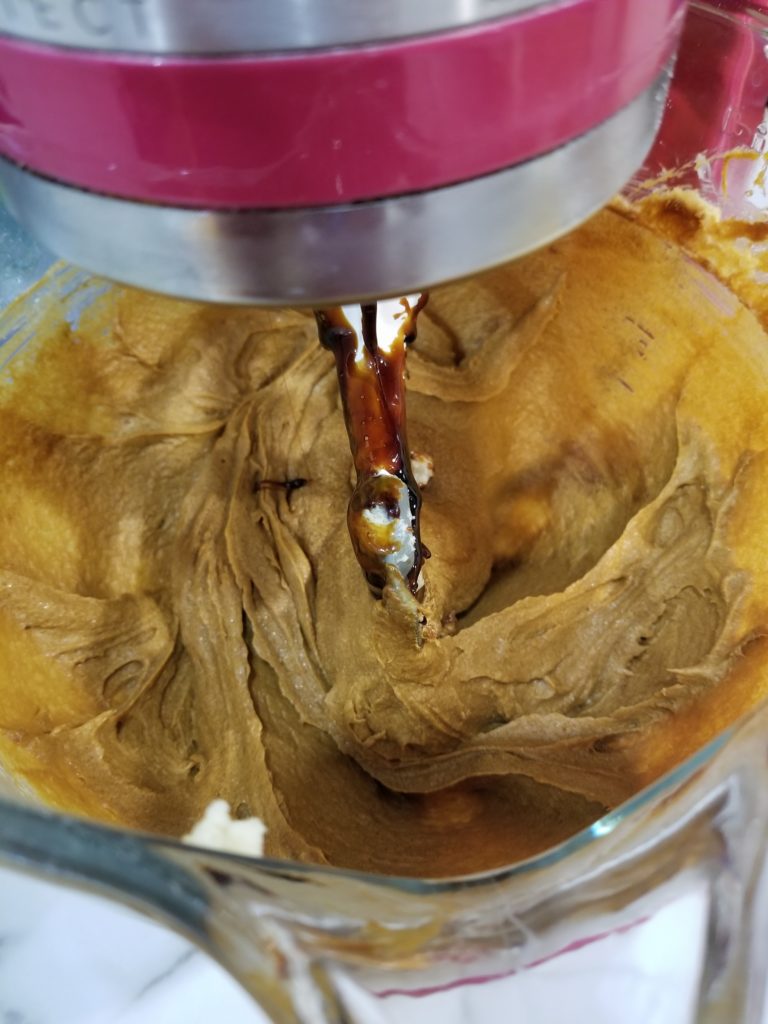
I followed the recipe so I won’t bore you with those details. I will however let you in on a little tip…..when you pour the molasses into your mixer, make sure it’s not running and the paddle is lifted. Voice of experience over here! I just left it running when I poured the molasses in and it got wrapped around the paddle attachment and ended up being a GIANT mess to clean up!
Also I needed to add most of an extra egg as my batter was really crumbly and didn’t hold together. I didn’t realize how crumbly it was until after it was rested in the fridge but I added the egg right before I rolled it out and they worked out just fine!
This recipe makes LOTS of cookies but they freeze really well. If you’re going to freeze them, freeze them plain, with no icing as the icing tends to crack and fall off when frozen. I just took cookies out of the freezer as we needed them, let them thaw for a couple of hours then iced them and they were good to go!
Well, I need to get my butt to the gym, I haven’t missed a workout all year I’m not about to start now 😉
I hope you all had a fabulous holiday season with your families!